
 English
  Italiano
  Français
  русский
  Deutsch
  Español
 The Chevrolet Niva is a compact SUV introduced to the Russian market in 2002 as a result of a joint project between GM and AvtoVAZ. Despite its modest dimensions, the car gained popularity due to its off-road capability and affordable price. However, over the years of production, it has garnered both fans and critics.
History of the Model
Originally, the car was developed as a deep modernization of the VAZ-2123 "Niva" – a legendary Soviet off-road vehicle. In 1998, AvtoVAZ presented a prototype, but due to financial difficulties, the project was frozen. In 2001, General Motors acquired a stake in the company, and the model received a new name – Chevrolet Niva.
Production began in 2002 at AvtoVAZ's facilities in Tolyatti. Unlike the classic "Niva" (VAZ-2121), the Chevrolet Niva featured a unibody construction, a modern (for its time) design, and an improved transmission.
In 2009, GM withdrew from the project, and the rights to the model were fully transferred to AvtoVAZ. However, the Chevrolet brand remained in the name under a licensing agreement.
Technical Features
Engine:
- The only power unit was a 1.7L gasoline engine (80 hp, later 83 hp) with multiport fuel injection.
- The engine is somewhat underpowered for off-roading but relatively fuel-efficient (10-12 L/100 km in the city).
Transmission:
- Permanent all-wheel drive with a lockable center differential (similar to the classic Niva).
- 5-speed manual transmission with a "long" first gear for starting in tough conditions.
Suspension:
- Independent front suspension (McPherson) and dependent rear suspension (solid axle).
- Ground clearance – 200 mm, which is low for an off-roader but compensated by short overhangs.
Safety:
- Standard features included ABS and one airbag (from 2014).
- According to ARCAP crash tests (2005), the model received 2 out of 5 stars.
How to Remove the Front Bumper
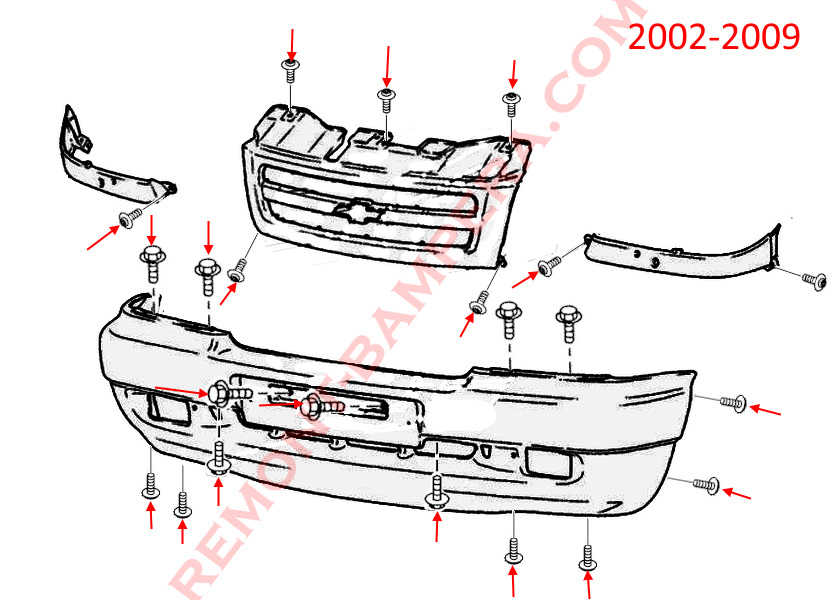
Model 2002-2009:
- Open the hood.
- Unscrew three screws from the top and two screws from the bottom, then remove the radiator grille.
- Behind the radiator grille, unscrew two screws and move the trim pieces near the headlights aside.
- Under the trim pieces, unscrew four screws securing the top part of the front bumper.
- From the bottom, unscrew four screws that are fastened upward.
- In the wheel arches, unscrew two screws on each side that secure the fender liners to the bumper and release the clips in the fenders.
- Unscrew two bolts in the bumper grille that are fastened upward.
- Remove the license plate and unscrew two bolts underneath it.
- With an assistant, pull the bumper forward to remove it.
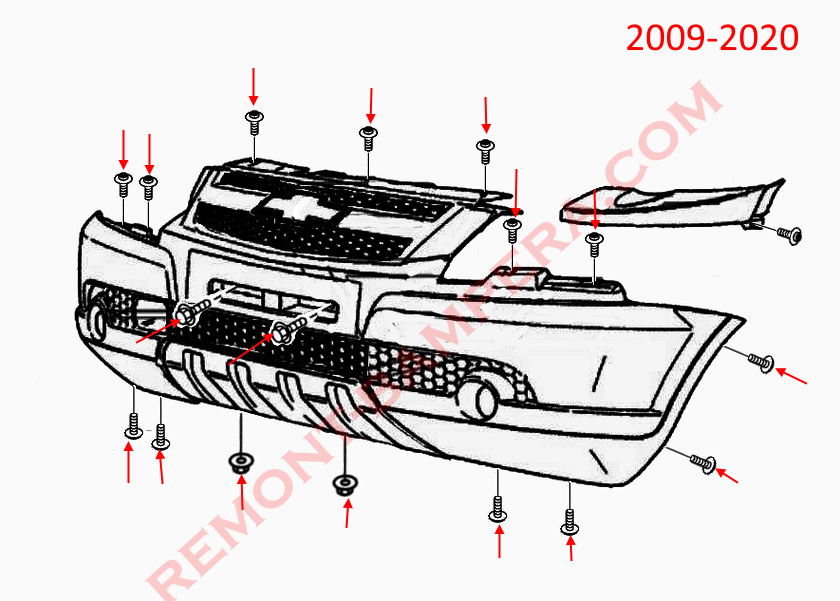
Model 2009-2020:
- Open the hood.
- Under the hood, unscrew three screws securing the top part of the front bumper.
- Unscrew four (or six) screws and two nuts (may be bolts) that are fastened upward and secure the lower part.
- Release the wheel arch trims from the clips (start from the radiator grille; they may be attached with double-sided tape) and move them aside.
- Behind the wheel arch trims, unscrew two screws on each side.
- Unscrew four screws in the wheel arches that secure the fender liners to the sides of the bumper.
- Remove the license plate along with its frame and unscrew two bolts underneath it.
- With an assistant, release the clips in the fenders (pull the corners toward yourself) and remove the bumper forward. Note the wiring for the fog lights.
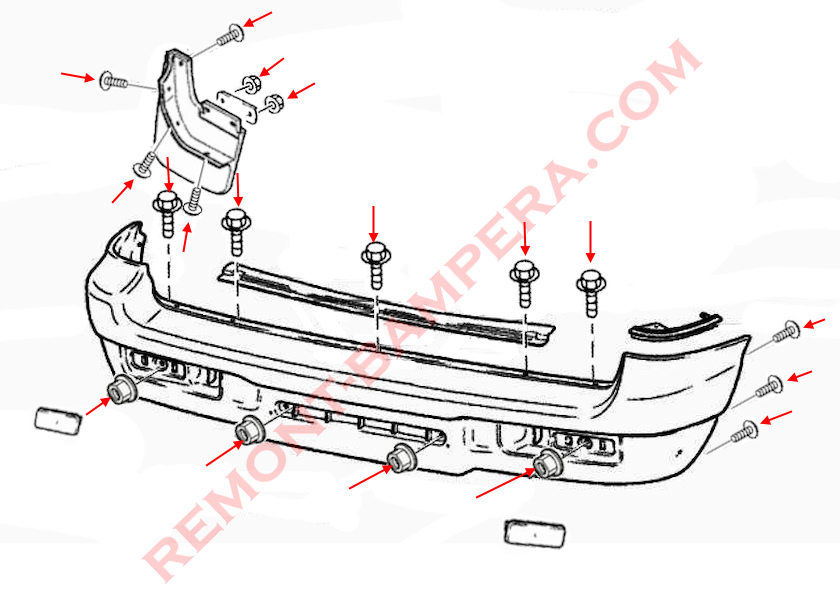
How to Remove the Rear Bumper
- Open the tailgate.
- Inside the trunk opening, unscrew five bolts that are fastened downward and secure the top part of the rear bumper. Remove the metal strip.
- In the wheel arches, unscrew four screws and two nuts on each side, then remove the mudguards.
- Behind the mudguards, unscrew three screws on each side that secure the fender liners to the bumper.
- Remove the license plate.
- Behind the license plate, unscrew two nuts.
- Remove the reflectors by reaching behind the bumper and pressing the clips with your fingers.
- Behind the reflectors, unscrew two more nuts.
- With an assistant, pull the bumper backward to remove it, then disconnect the wiring harnesses for the license plate lights.
Advantages of the Chevrolet Niva
- Off-road capability – Thanks to its compact size, all-wheel drive, and locking differential, the car performs well off-road.
- Repairability – Simple design and readily available parts reduce maintenance costs.
- Price – One of the most affordable SUVs on the used market (starting from 200,000 RUB for a 2015-2017 model).
- Ground clearance and geometry – Short overhangs allow for tackling steep inclines and ruts.
Disadvantages of the Model
- Build quality – Squeaky plastic, poor sound insulation, and body corrosion (especially on the sills and wheel arches).
- Weak engine – Acceleration to 100 km/h takes 19 seconds, making highway overtaking difficult.
- Cramped interior – Rear passengers lack space, and the trunk is only 320 liters.
- Outdated design – Even after the 2014 facelift, the interior and technology lag behind competitors.
Interesting Facts
- Original name – The project was initially designated VAZ-2123 but was renamed after the deal with GM.
- Export versions – The car was sold in Latin America as the Lada Niva and in Europe as the Chevrolet Niva.
- Sport version – In 2006, a concept called the Chevrolet Niva Turbo (150 hp) was introduced, but it never entered mass production.
- Long production run – The model was produced for 20 years (2002-2021) without major changes.
Comparison with Competitors
Compared to the Renault Duster or Lada 4x4 (VAZ-2121), the Chevrolet Niva falls short in comfort and performance but wins in price and simplicity of design.