
 English
  Italiano
  Français
  русский
  Deutsch
  Español
 Production Years
The first-generation Chevrolet Orlando was produced from 2010 to 2018. The model debuted at the Paris Motor Show in 2010, and serial production began in 2011. The car was positioned as a compact MPV, combining features of a minivan and a crossover.
The main sales markets were Europe, Russia, South Korea (where it was sold under the name Daewoo Orlando), Canada, and some Asian countries. The model was not officially supplied to the U.S., as General Motors focused on larger minivans like the Chevrolet Traverse.
Model Description
Design and Dimensions
The Chevrolet Orlando I was built on the GM Theta II platform, which was also used for the Chevrolet Cruze. The exterior design combined elements of a hatchback and a minivan: a sloping roof, roof rails, a slightly raised ground clearance (157 mm), and an aggressive front end with a characteristic Chevrolet-style radiator grille.
Dimensions:
- Length – 4652 mm
- Width – 1836 mm
- Height – 1636 mm
- Wheelbase – 2760 mm
Despite its compact size, the Orlando offered a third row of seats, which was rare in this class.
Interior and Comfort
The cabin was designed for 5 or 7 seats (depending on the trim). The third row was more suitable for children or short trips by adults. The material quality was at the budget level: hard plastic, simple fabric upholstery. Top trims offered leather seats, heated seats, and climate control.
Trunk capacity:
- 5 seats – 322 L
- 7 seats – 89 L (with the third row up)
- Folded seats – up to 1485 L
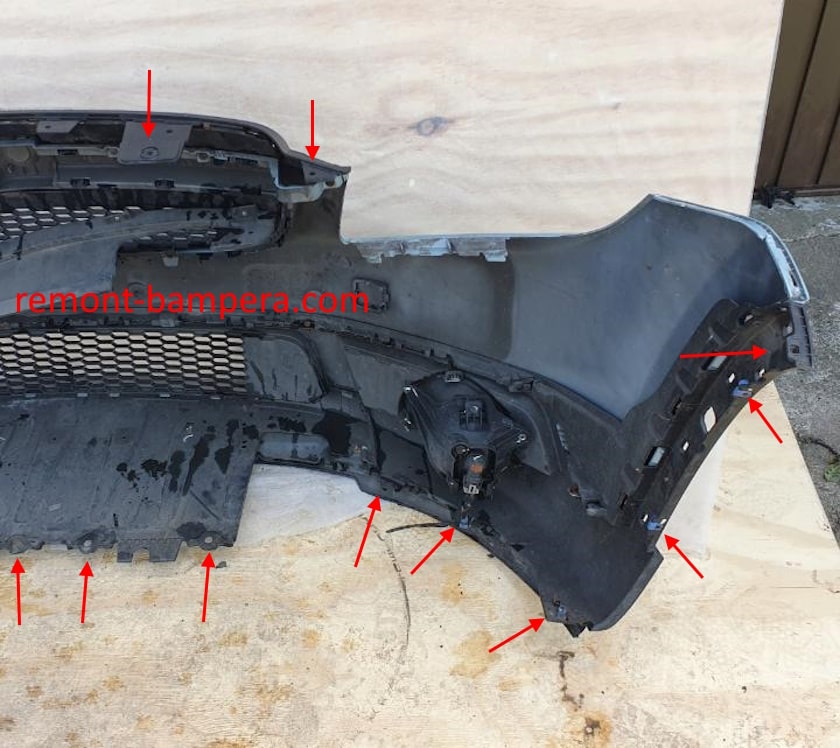
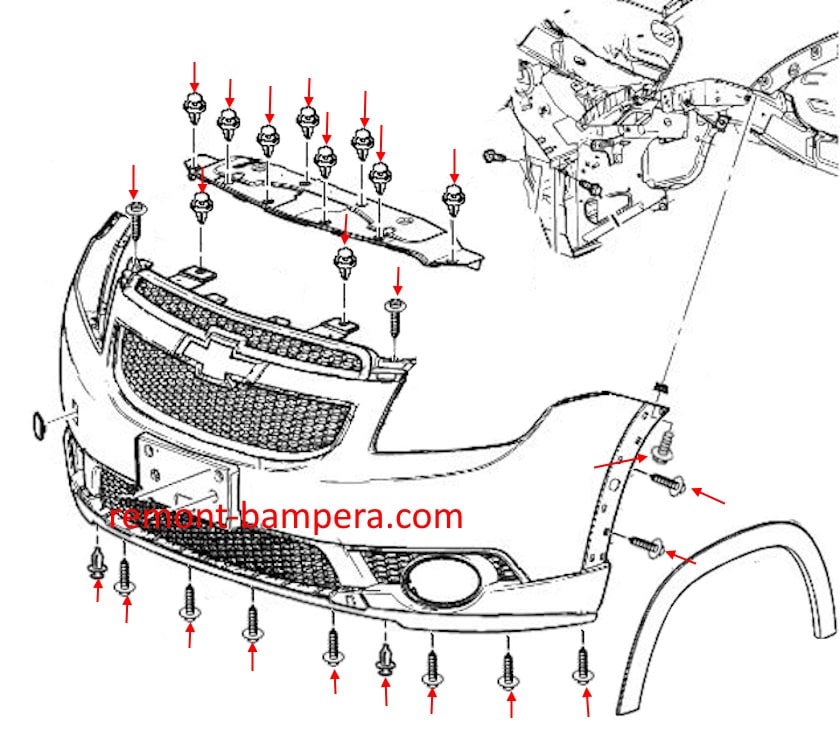
How to Remove the Front Bumper
- Open the hood.
- Remove eight push pins under the hood and take off the cover.
- Under the cover, remove two push pins and unscrew two screws securing the upper part of the front bumper (radiator grille).
- From underneath, unscrew ten screws and remove two push pins (inserted from bottom to top) securing the lower part.
- Turn the wheels to the side.
- In the wheel arches, unscrew the screws securing the fender liners and arch covers (front part).
- Release the arch covers from the clips (pull toward yourself from bottom to top).
- Unscrew one screw on each side (inserted from bottom to top) securing the corners to the fenders.
- Release the clips in the fenders (pull the corners downward and toward yourself).
- Release the clips under the headlights.
- With an assistant, pull the bumper forward (watch for wiring).
- Disconnect the temperature sensor and fog light connectors (if equipped).
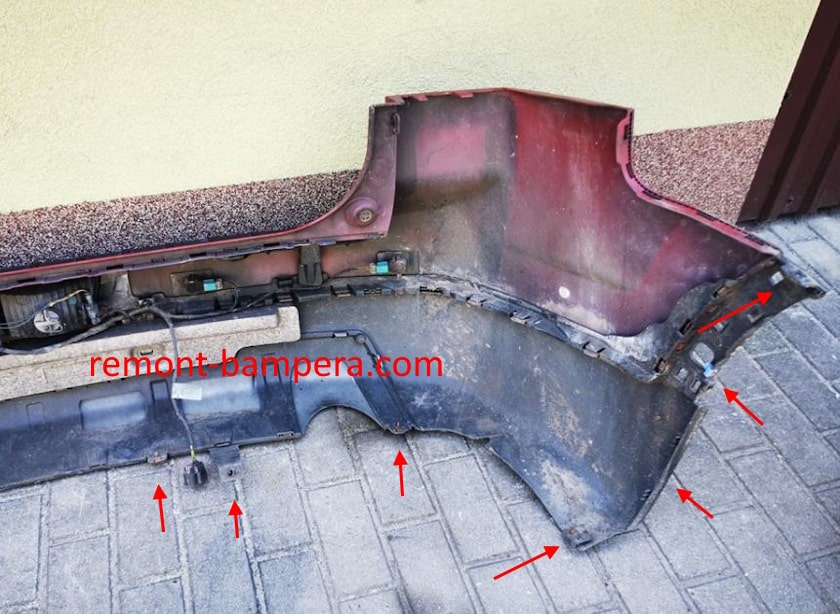
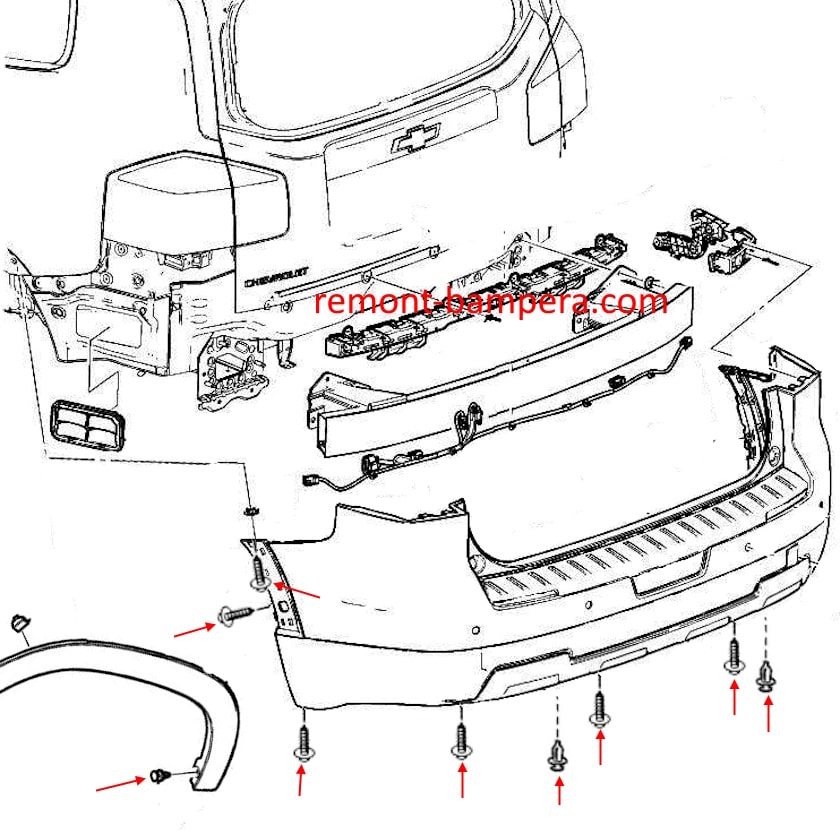
How to Remove the Rear Bumper
- Open the trunk lid.
- From underneath, remove the push pins and unscrew the screws (inserted from bottom to top) securing the lower part of the rear bumper.
- In the wheel arches, unscrew the screws and remove the push pins securing the arch covers and fender liners (rear part).
- Release the arch covers from the clips in the bumper (pull toward yourself from bottom to top).
- Unscrew one screw on each side (inserted from bottom to top) securing the corners to the fenders.
- Release the clips in the fenders (pull the corners toward yourself).
- Release the clips under the taillights and in the trunk opening.
- With an assistant, pull the bumper backward (watch for wiring).
- Disconnect the electrical connectors.
Technical Specifications
In Europe and Russia, the Orlando was offered with three engines:
- Petrol 1.8L (141 HP) – 6-speed manual or automatic.
- Diesel 2.0L (131 HP and 163 HP) – manual only.
- Petrol 1.4L Turbo (140 HP) – available in some regions.
Acceleration to 100 km/h took 10-12 seconds, depending on the engine. Fuel consumption:
- 1.8L – 8.5-9.5 L/100 km
- 2.0L Diesel – 5.5-6.5 L/100 km
The suspension featured a MacPherson strut at the front and a multilink setup at the rear, providing decent handling but a somewhat stiff ride on rough roads.
Interesting Facts
- The Orlando was developed as a global model but never made it to the U.S. due to low demand for compact MPVs.
- In South Korea, it was sold as the Daewoo Orlando because the Chevrolet brand was not popular there.
- In 2015, the model underwent a facelift: the grille, bumpers were updated, and new features (e.g., a rearview camera) were added.
- In Russia, the Orlando was assembled at the GM plant in St. Petersburg until its closure in 2015.
Pros and Cons
Pros:
- Versatility (can carry up to 7 people).
- Good trunk space with folded seats.
- Affordable price (on the used market today – from 500,000 RUB).
- Reliable diesel engines (with proper maintenance).
Cons:
- Weak petrol engines (the 1.8L was often criticized for lack of power).
- Stiff suspension (less comfortable than competitors like the Ford C-MAX).
- Poor sound insulation.
- The third row is too cramped for adults.
Conclusion
The first-generation Chevrolet Orlando is a practical but flawed compact MPV. It suits those who need an affordable family car with 7-seat capability. However, the petrol versions are not very economical, and the interior materials are mediocre. If choosing an Orlando, the diesel version is preferable—more reliable and fuel-efficient.
Production ended in 2018 as General Motors phased out most minivans in favor of crossovers. However, on the used market, the Orlando remains a decent budget option.