
 English
  Italiano
  Français
  русский
  Deutsch
  Español
 The Volkswagen Atlas and its twin, the Teramont (for markets outside the U.S.), are full-size crossovers designed for family use. The model combines a spacious interior, powerful engines, and modern technology. Let’s take a look at its production history, modifications, and key features.
Production Years and Markets
- The Atlas debuted in 2017 for the U.S. market, where it is manufactured at the Chattanooga plant (Tennessee).
- The Teramont was introduced in 2017 for China, Russia, the Middle East, and Latin America. Assembly takes place in China (FAW-VW) and Russia (until 2022 at the Kaluga plant).
- In 2020, a facelift was introduced with updated design and new electronics.
- The second generation is expected in 2025.
Platform and Construction
The Atlas/Teramont is built on the modular MQB platform, which is also used in the Tiguan and other VW Group models. This is a front-wheel-drive platform with optional all-wheel drive (4Motion).
Modifications and Engines
Different regions offered various powertrains:
Gasoline Engines (Main Options)
- 2.0 TSI (220–238 HP) – Base engine for the Atlas and Teramont.
- 3.6 VR6 (276–280 HP) – Available only in the U.S. (Atlas).
- 2.5 TSI (299 HP) – Turbocharged version for the Chinese market.
Diesel Engines (Teramont for Europe and Russia until 2022)
- 2.0 TDI (150–190 HP) – Fuel-efficient option.
Hybrid Version (China)
- PHEV Teramont (245 HP) – Plug-in hybrid.
Transmission Options
- 6-speed automatic (AQ250) for the 2.0 TSI.
- 8-speed automatic (AQ500) for the VR6 and 2.5 TSI.
- 7-speed DSG (DQ500) for diesel versions.
Bumper Plastic Marking: >PP+EPDM-TD10<
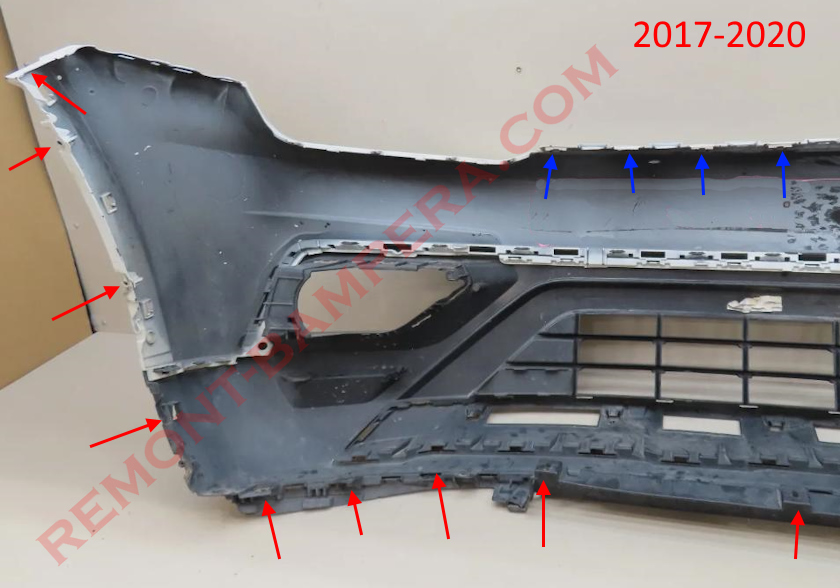
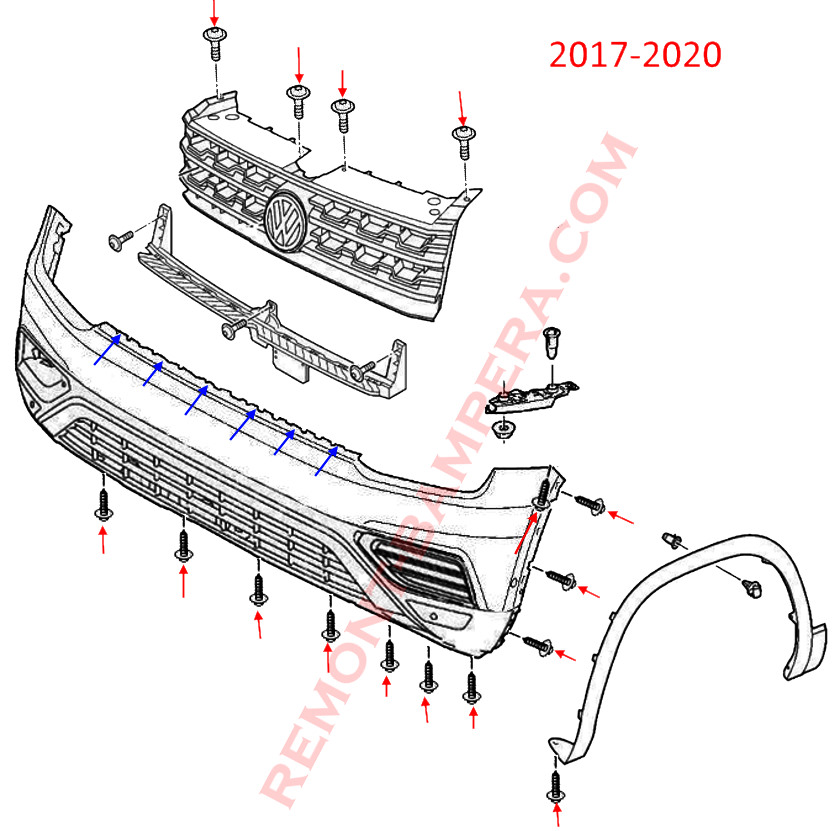
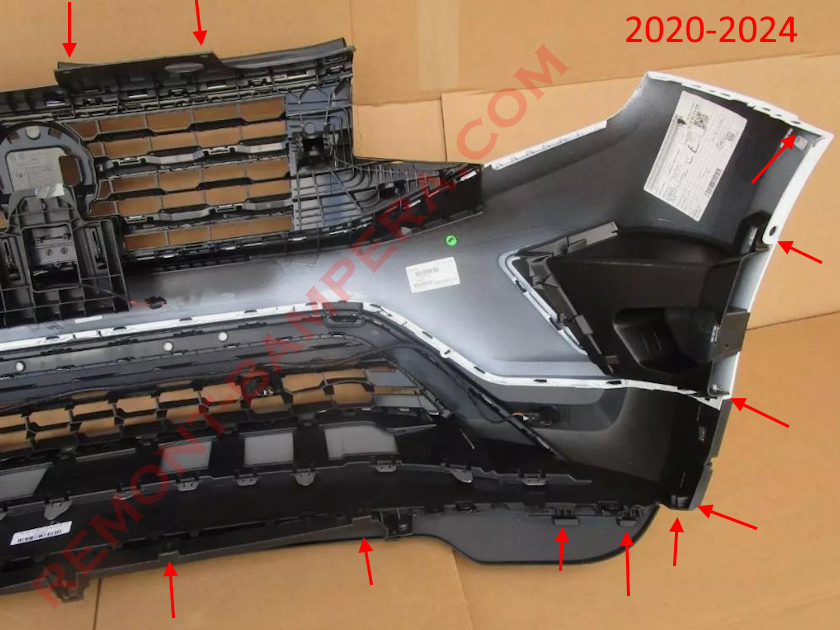
How to Remove the Front Bumper
- Open the hood.
- Under the hood, unscrew the four screws (fastened top to bottom) securing the radiator grille.
- (2017-2020) Release the clips and remove the radiator grille. Under the grille, release the clips (marked with blue arrows) securing the upper part of the front bumper.
- From underneath, unscrew the nine screws (fastened bottom to top) securing the lower part and two screws securing the wheel arch extensions.
- Turn the wheels outward.
- In the wheel arches, unscrew the screws securing the fender liners and wheel arch extensions (front part).
- Release the front part of the wheel arch extensions from the clips (pull toward yourself from bottom to top).
- Move the fender liners aside and unscrew one screw on each side (fastened bottom to top) securing the corners to the fenders.
- Release the clips in the fenders (pull the corners toward yourself).
- With an assistant, remove the bumper forward (ensure no wires are snagged).
- Disconnect the electrical connectors.

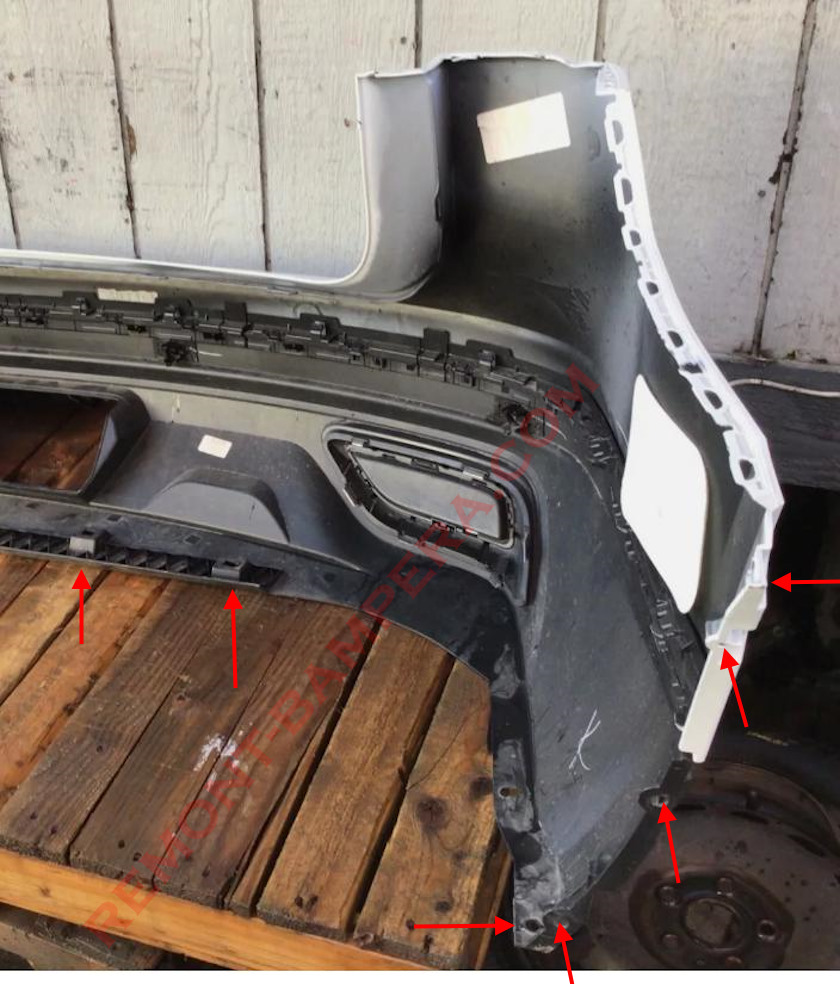
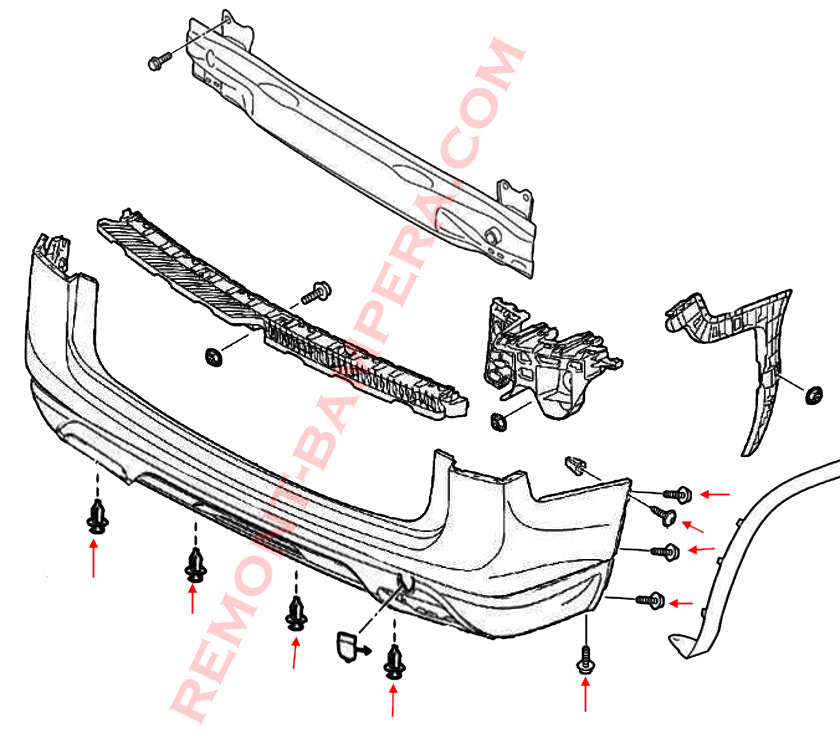
How to Remove the Rear Bumper
- Open the trunk lid.
- From underneath, unscrew two screws and remove four push pins (fastened and inserted bottom to top).
- Release the wheel arch extensions (rear part) from the clips (pull toward yourself from bottom to top).
- Unscrew three screws on each side securing the fender liners.
- Under the wheel arch extensions, unscrew one screw on each side securing the corners to the fenders.
- Release the clips in the fenders (pull the corners toward yourself).
- Release the clips under the taillights and in the trunk opening.
- With an assistant, carefully remove the bumper backward (watch for wires).
- Disconnect the electrical connectors (if present).
Trim Levels and Features
The Atlas/Teramont was offered in several configurations:
- Trendline (Base) – Minimal features.
- Comfortline (Mid-range) – Climate control, multimedia.
- Highline (Top-tier) – Leather, panoramic roof, adaptive cruise.
Technologies
- Digital Cockpit.
- Apple CarPlay / Android Auto support.
- Traffic sign recognition.
- All-wheel drive with multiple modes (Sand, Snow, On-Road).
Differences Between Atlas and Teramont
- Atlas (U.S.) – No diesel engines, VR6 available, different grille design.
- Teramont (Other Markets) – Diesel engines, hybrid, sometimes an extended version (X).
Interesting Facts
Name Origins
- "Atlas" refers to the Greek Titan, symbolizing strength.
- "Teramont" combines "terra" (earth) and "mont" (mountain).
Russian Production
The Teramont was assembled in Kaluga from 2018 to 2022, but production was halted due to sanctions.
Safety
In 2021, the Atlas received a 5-star rating in NHTSA tests (U.S.).
Special Versions
- Teramont X (China) – Coupe-like variant.
- Atlas Cross Sport (U.S.) – Shortened version.
Electric Future
In 2025, the ID.8 electric crossover is expected to replace the Atlas in VW’s lineup.
Conclusion
The Volkswagen Atlas/Teramont is a practical family crossover with powerful engines and a spacious interior. Despite regional differences, the model remains popular due to its reliability and comfort. With the arrival of a new generation and electric variants, the lineup will continue to evolve.