
 English
  Italiano
  Français
  русский
  Deutsch
  Español
 Model Name and Production Years
The first-generation Volkswagen Sharan (sometimes referred to as Typ 7M) was produced from 1995 to 2010. However, this guide focuses on the 2000–2010 period, which includes the facelifted versions. In 2000, the model underwent a significant update, followed by a minor cosmetic refresh in 2004.
Model Code and Body Type
- Model code (platform): VW Typ 7M (based on the Volkswagen Group B-VX62 platform, shared with the Ford Galaxy and Seat Alhambra).
- Body type: 5-door MPV (minivan).
Facelifts and Modifications
- Pre-facelift version (1995–2000):
- Original design with rounded shapes.
- Gasoline engines: 1.8L (125 HP), 2.0L (115 HP), 2.8L VR6 (174 HP).
- Diesel engines: 1.9L TDI (90, 110 HP), 2.0L SDI (75 HP).
- First update (2000–2004):
- New bumpers, grille, and headlights.
- Redesigned interior with improved materials.
- Added 2.0L TDI (136 HP) and 1.9L TDI (130 HP) with unit injectors (PD).
- Top version: 2.8L VR6 (204 HP) with a 6-speed automatic transmission.
- Second facelift (2004–2010):
- More modern lighting and chrome accents.
- New wheel designs and updated dashboard.
- Introduction of the DSG transmission (for the 2.0 TDI).
- Production ended in Europe in 2008, but continued in some markets (e.g., China) until 2010.
Bumper Plastic Marking: >PP+EPDM-T10<
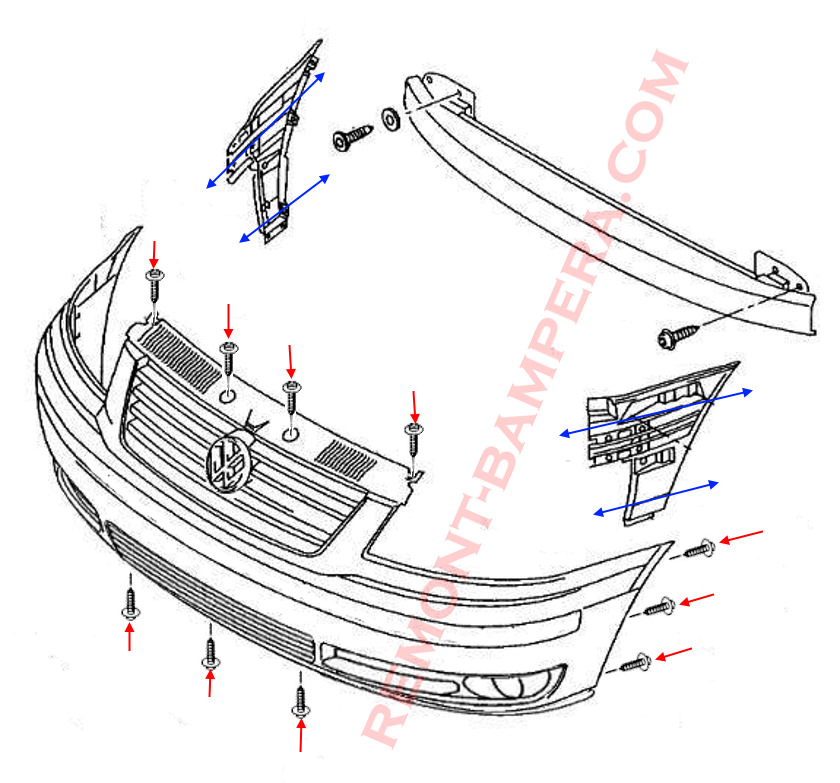
How to Remove the Front Bumper
- Open the hood.
- Under the hood, unscrew the four screws (fastened top to bottom) securing the upper part of the front bumper.
- At the bottom, unscrew the three screws (fastened bottom to top) securing the bumper to the front support panel.
- Turn the wheel inward.
- In the wheel arch, unscrew three screws (three on each side).
- Release the sides from the guide rails in the fenders (grab the corners and pull forward parallel to the ground—best done with two people).
- Disconnect the wiring harnesses for the temperature sensor and fog lights.

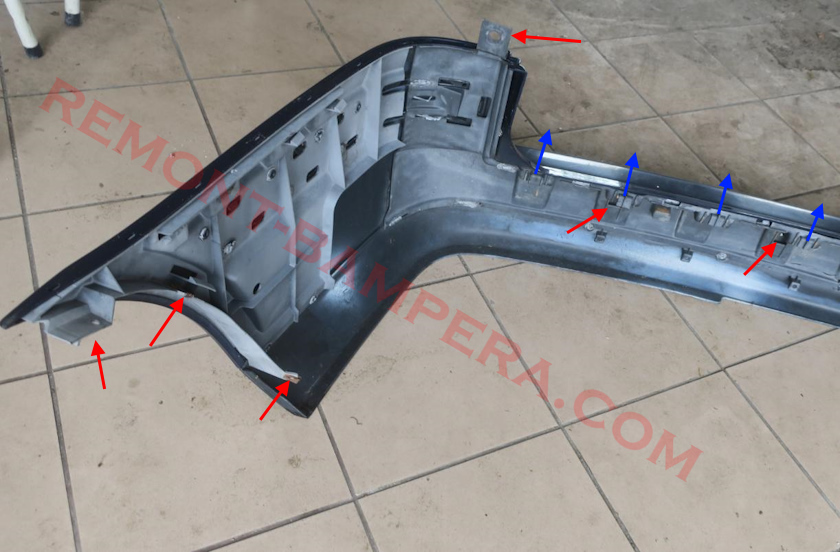
How to Remove the Rear Bumper
- Lift the trunk lid.
- Remove the trim panels under the taillights (held by clips; pry from the trunk side and pull toward you).
- Under the trim panels, unscrew two screws.
- In the wheel arches, unscrew two screws on each side securing the rear part of the wheel liners and one screw securing the corners to the guide rails.
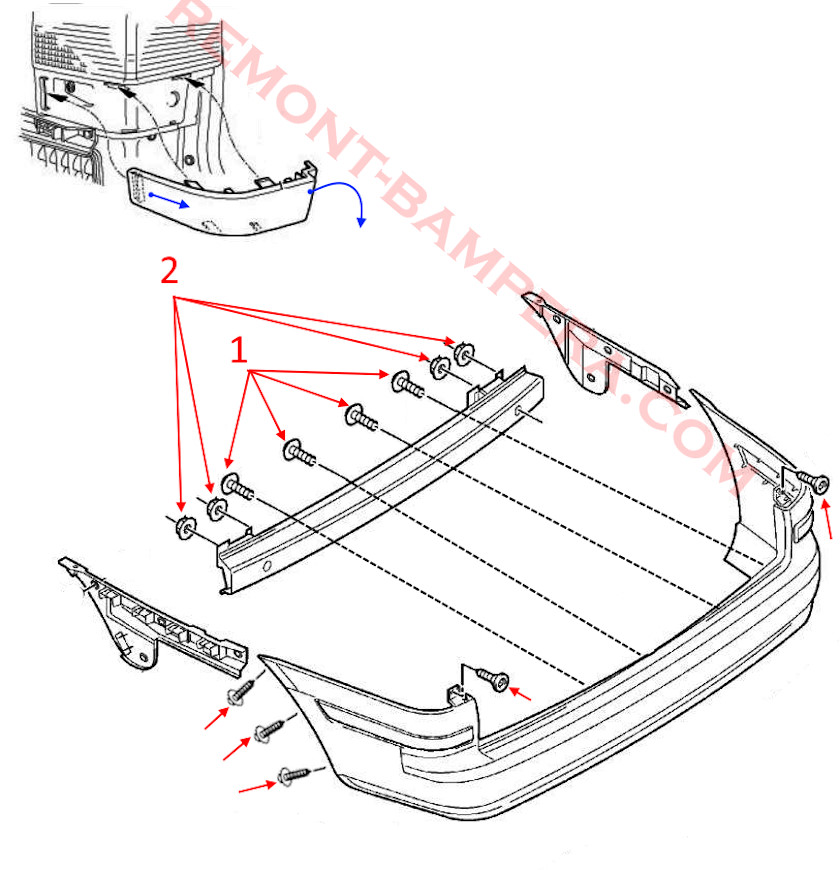
- You can remove the bumper either with or without the metal reinforcement:
- From underneath, unscrew four screws securing the bumper to the reinforcement (note: these screws can strip easily).
- Unscrew four nuts securing the metal reinforcement to the body.
- Release the sides from the guide rails in the fenders (pull the corners toward you).
- With an assistant, remove the bumper backward (note: the top part of the bumper fits into slots in the reinforcement, so if you unscrewed the underside screws, lift the bumper slightly when removing).
- If equipped with parking sensors, disconnect the wiring harness.
Trim Levels and Equipment
- Trendline: Base version, minimal features.
- Comfortline: Mid-range, includes A/C and power accessories.
- Highline: Luxury trim, leather, climate control.
- Sportline (rare): Sporty styling, stiff suspension.
- Special Editions: E.g., "Family" with additional child-friendly accessories.
Technical Features
- Engines (2000–2010):
- 2.0L (115 HP, 8V) – Weak but reliable.
- 2.8L VR6 (174/204 HP) – Most powerful but fuel-thirsty.
- 1.9L TDI (90–130 HP) – Most popular, fuel-efficient.
- 2.0L TDI (136–140 HP) – More powerful but harder to repair.
- Transmission:
- 5- and 6-speed manual.
- 4- and 6-speed automatic (for VR6).
- From 2004: DSG (6-speed) for 2.0 TDI.
- Drivetrain: Front-wheel drive only (4Motion was not offered).
Interesting Facts
- Joint project with Ford: The Sharan was developed alongside the Ford Galaxy and Seat Alhambra at the AutoEuropa plant in Portugal, reducing costs but resulting in similar designs.
- Safety: In 2001, the Sharan earned 4 stars in Euro NCAP tests—a good result for its time.
- Interior flexibility: Seats could be arranged in 32 configurations, including a "camping mode" (completely flat floor).
- Rare version: In 2005, a Sharan Syncro with AWD was offered, but only in Switzerland.
- Longevity: Despite being replaced in Europe by the Sharan Mk2 (2010), it continued production in China until 2010 as the Volkswagen Touran XL.
Conclusion
The Volkswagen Sharan Mk1 (2000–2010) is a practical minivan combining German build quality and versatility. After the 2000 and 2004 updates, it became more modern while retaining reliability. Key strengths include a spacious interior and efficient diesel engines, while drawbacks include high maintenance costs for the VR6 and an outdated platform by 2010.