
 English
  Italiano
  Français
  русский
  Deutsch
  Español
 The Volkswagen Gol remained one of the most popular budget cars in Latin America, especially in Brazil, where it repeatedly became a bestseller.
Gol (1999–2008) – "Gol Power"
Key Features
Design:
- More rounded shapes compared to the Gol II (resembling the VW Polo III).
- After the 1999 facelift – new bumpers, grille, and headlights.
Body:
- 3-door and 5-door hatchback.
- Sedan – Volkswagen Voyage.
- Pickup – Volkswagen Saveiro (based on the Gol platform).
Engines:
- 1.0L (50–72 HP) – base engine; a 16-valve version (72 HP) appeared in 1999.
- 1.6L (94–101 HP) – the main engine.
- 1.8L (112 HP) – in the sporty Gol GTI (1996–2000).
- 2.0L (116 HP) – in later models (2000s).
- Flex-fuel (ethanol) versions were available in Brazil.
Transmission:
- 5-speed manual.
- 3-speed automatic (rare, mostly for 1.6L and 1.8L).
Safety:
- ABS (only in top versions).
- Airbags (from the late 1990s).
Sport Versions:
- Gol GTI (1.8L, 112 HP) – similar to the European Polo GTI.
- Gol Turbo (1.8L turbocharged, 138 HP) – a rare model.
Depending on the year of manufacture and body type, the mounting points may differ.
Gol / Pointer (1994-2008)
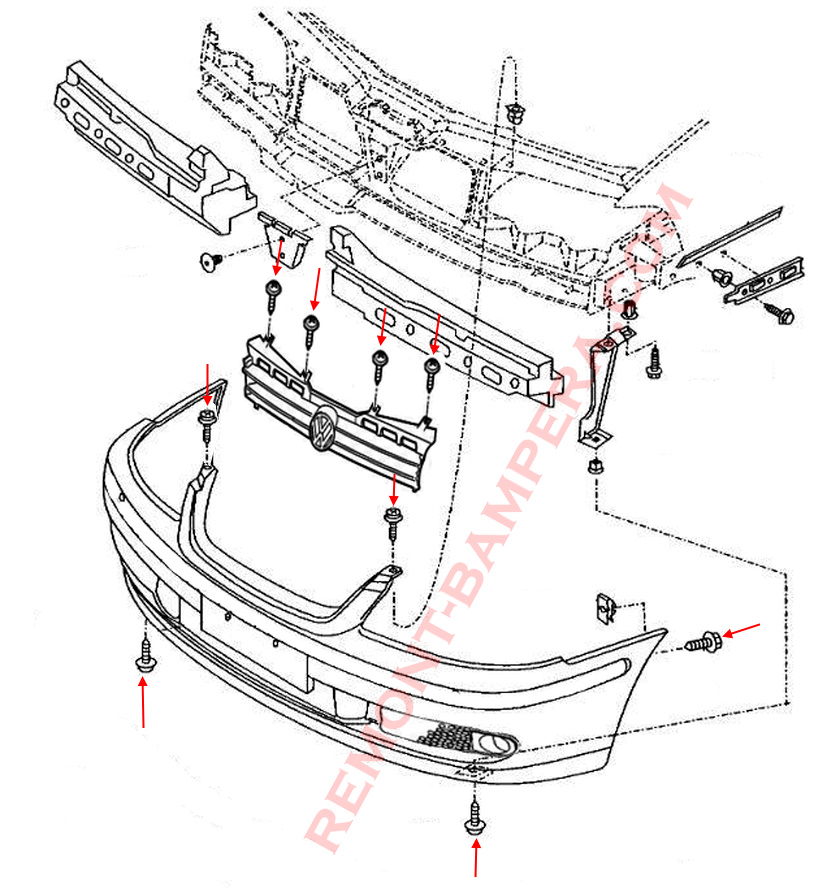
How to Remove the Front Bumper
- Open the hood.
- Under the hood, unscrew the bolts securing the grille and the top of the bumper.
- From underneath, unscrew the bolts (fastened from bottom to top).
- Turn the wheels to the side.
- In the wheel arches, unscrew the bolts holding the fender liners.
- Unscrew the bolts securing the sides of the bumper to the fenders.
- With an assistant, pull the bumper forward off the guides in the fenders (watch for wiring).
- Disconnect any electrical connectors (if present).
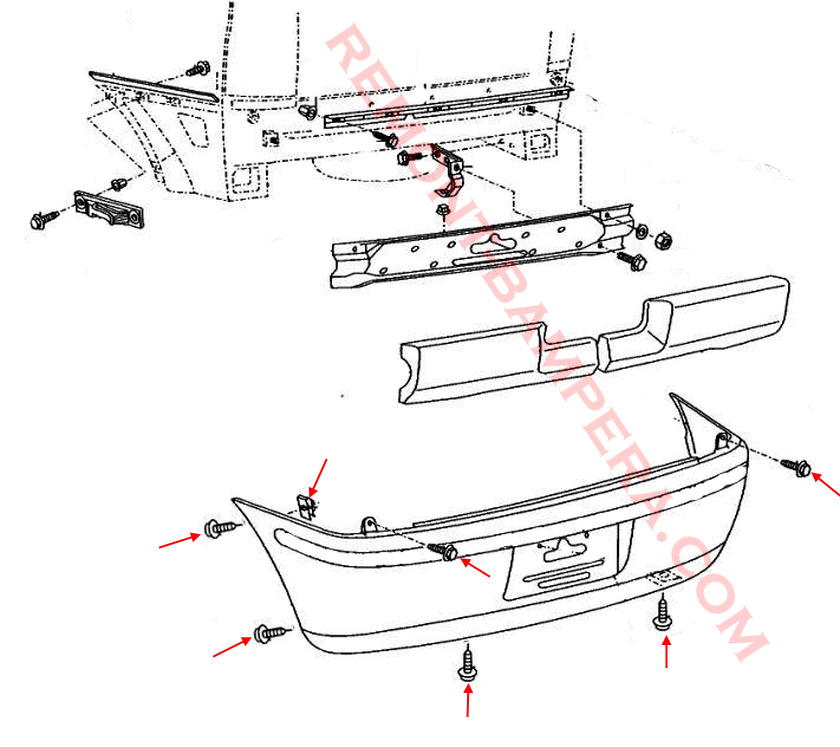
How to Remove the Rear Bumper
- Open the trunk lid.
- Remove the trim panels under the taillights.
- Unscrew the bolts securing the top of the bumper.
- In the wheel arches, unscrew the bolts holding the rear part of the fender liners.
- Unscrew the bolts securing the corners of the bumper to the fenders.
- Unscrew the bolts holding the bottom of the bumper (fastened from bottom to top).
- With an assistant, pull the bumper backward off the guides in the fenders (watch for wiring).
- Disconnect any electrical connectors (if present).
Gol (2008–2016) – "Gol G5"
Key Changes
Design:
- More modern, with rounded lines (influenced by the VW Fox).
- New bumpers, grille, and headlights.
- A minor facelift in 2009 (updated grille and bumpers).
Body:
- 3-door and 5-door hatchback.
- Sedan – Voyage.
- Pickup – Saveiro.
Engines:
- 1.0L (72–76 HP) – base engine, but with improved performance.
- 1.6L (101–104 HP) – the main engine.
- 2.0L (116 HP) – in top versions.
- 1.0L TSI (128 HP) – turbocharged (from 2012).
- Flex-fuel engines (gasoline/ethanol).
Transmission:
- 5-speed manual (standard).
- 6-speed manual (for 1.0 TSI).
- 4-speed automatic (rare).
Safety:
- ABS (in most versions).
- Airbags (2 front).
- Reinforced body (better passive safety).
Comfort:
- Air conditioning (in mid and high trims).
- Electric power steering (replaced hydraulic).
- Improved sound insulation.
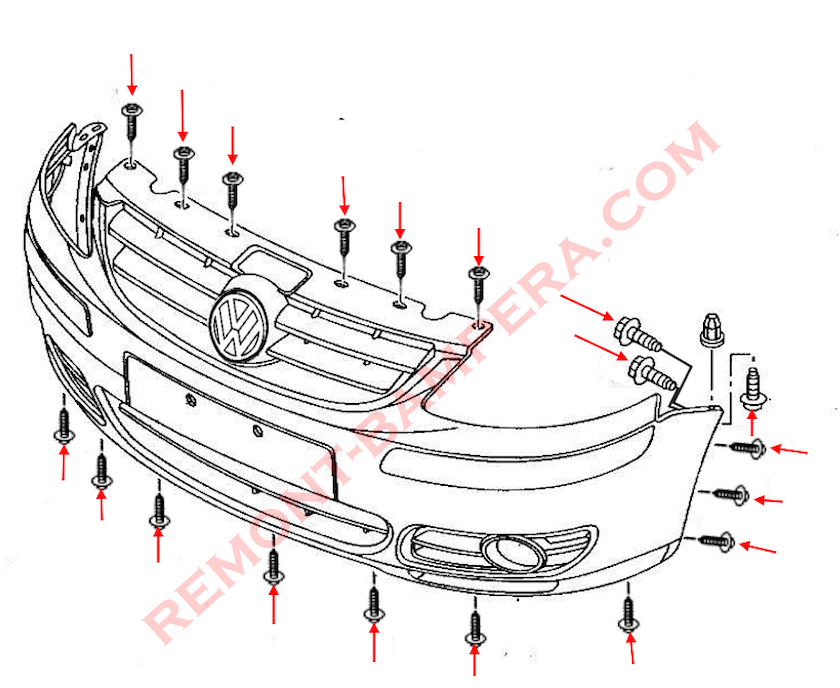
How to Remove the Front Bumper
- Open the hood.
- From the top, unscrew 6 bolts securing the upper part of the bumper (fastened from top to bottom).
- From underneath, unscrew 7 bolts securing the lower part of the bumper (fastened from bottom to top).
- Turn the wheels to the side and in the wheel arches, unscrew:
- 3 bolts on each side holding the fender liners.
- 1 bolt (fastened from bottom to top) securing the bumper corners to the fenders.
- Move the fender liners aside and unscrew 2 bolts on each side (fastened from the engine bay) securing the brackets to the fenders.
- With an assistant, carefully remove the bumper by pulling it forward (watch for wiring).
- Disconnect the temperature sensor and fog light connectors (if present).
How to Remove the Rear Bumper
- Remove the rear wheels (optional but makes it easier).
- In the wheel arches, unscrew 3 bolts on each side securing the rear part of the fender liners.
- Pull back the fender liners and unscrew:
- 2 bolts (fastened from bottom to top).
- 1 nut (located below the taillights).
- From underneath, unscrew 3 bolts securing the lower part of the bumper (fastened from bottom to top).
- Release the clips in the trunk opening and remove the bumper by pulling it backward (watch for wiring).
- Disconnect the license plate light and parking sensor connectors (if installed).
