Front bumper

-open the hood.

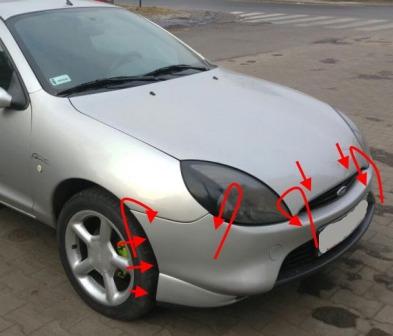
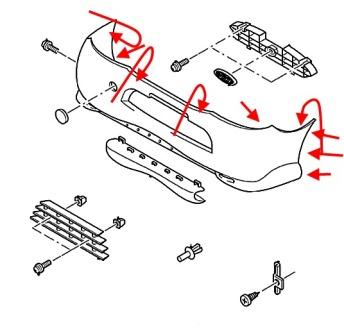
-under the hood, take out the clips and remove the grille.

-Unscrew the screws and remove the headlamp.

-behind the headlights, Unscrew the nuts (you will need an extra long head) holding the bumper to the front frame and the screws (near the spar) that secure the brackets.

-wheel arches Unscrew the screws that attach the fender liner.

-attach the fender liner to the side and Unscrew one screw on each side holding the bumper corners to the wings.

-gently pulls the bumper forward with the assistant.

-snap together the connectors of electrical equipment.

seat mounting front bumper Ford Puma

the scheme of mounting front bumper Ford Puma

Rear bumper

⇒Tips for removing bumpers and how to avoid breaking anything..⇐

-open the trunk lid.

-in the trunk take out the caps and remove the rear trim panel.

-the casing Unscrew the four nuts (will need an extra long head) holding the bumper to the rear.

-wheel arches Unscrew three screws on each side holding the wheel arch liners (to remove the wheels easier to turn the ratchet with the extension).

-remove the fender liner to the side and Unscrew the screws holding the corners of the bumper to the wings.

-we release bumper latches in the wings (pull the corners themselves).

-with the assistant gently pulls the bumper back.

-remove the connectors from the light elements.

the attachment of the rear bumper of the Ford Puma

the scheme of fastening the rear bumper of the Ford Puma