
 English
  Italiano
  Français
  русский
  Deutsch
  Español
 The Audi Q8 is the flagship SUV of the German brand, combining sporty design, cutting-edge technology and premium-class comfort. The model was developed as a response to the BMW X6 and Mercedes-Benz GLE Coupe, but Audi took its own path, focusing not only on aggressive styling but also on practicality.
Internal Designation and Platform
Internally, the Audi Q8 is known as Typ 4M. It's built on the modular MLB Evo platform, which is also used by the Audi Q7, Bentley Bentayga, Lamborghini Urus and Volkswagen Touareg. This means the Q8 features an aluminum architecture that reduces weight and an advanced suspension with adaptive management.
Production Years and Facelift
- Debut and sales launch: The Q8 was first revealed in 2018 with serial production starting the same year. Sales began in Europe in summer 2018 and in Russia in early 2019.
- Facelift: In 2023, Audi updated the Q8. Changes affected the front end with a new radiator grille, redesigned bumpers and modern HD Matrix LED headlights. The interior received an updated multimedia system with a third screen (in top versions) and expanded driver assistance systems.
Body Type
The Q8 is positioned as a coupe-crossover, though it's actually more of a conventional SUV with a sloping roofline. Unlike the Mercedes GLE Coupe or BMW X6, the Audi offers a more practical silhouette - it maintains a spacious trunk (605 liters) and easy access to the rear seats.
Bumper Plastic Marking: >PP/PE+TPO-TD15<
How to Remove Front Bumper
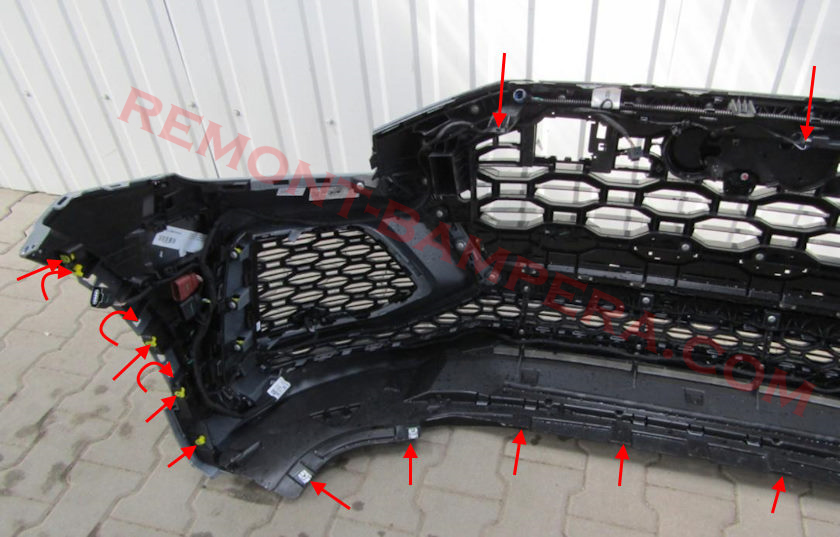
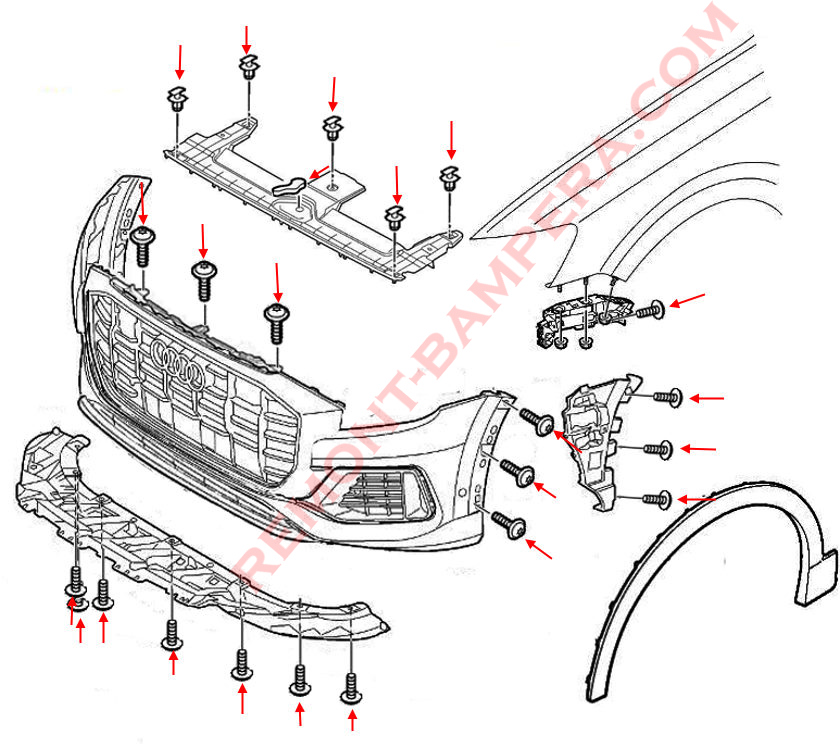
- Open the hood
- Remove the hood release lever (press the latch with your finger and pull the lever up)
- Remove five push-pins and detach the plastic cover above the radiator grille (freeing air intakes)
- Disconnect washer hoses and camera connectors
- Under the cover, unscrew three bolts (inserted top-to-bottom) securing the upper bumper section
- Remove bolts along the lower edge (inserted bottom-to-top)
- Release fender extensions (front section, pull outward bottom-to-top)
- Under extensions, remove three bolts per side
- Turn wheels to the side
- In wheel arches, remove three bolts per side securing front fender liners
- Move liners aside and remove one bolt per side securing corners to brackets
- Release clips in fenders (pull corners outward)
- With assistant, remove bumper by pulling forward (watch for wires)
- Disconnect electrical connectors
How to Remove Rear Bumper
- Open tailgate
- Remove rear light covers (secured by clips)
- Under covers, remove two bolts per side and detach rear lights
- Under lights, remove two bolts (inserted top-to-bottom)
- From underside, remove eight bolts (inserted bottom-to-top) securing lower bumper
- Release wheel arch covers (secured by clips)
- Under covers, remove two bolts per side
- In wheel arches, remove bolts securing rear fender liners
- Move liners aside and remove bolts
- Release clips in fenders (pull corners outward)
- Release clips under rear lights
- With assistant, carefully remove bumper by pulling rearward (watch for wires)
- On left side, open cover in side trim and disconnect main electrical connector
- Free wiring harness from body


Model Description
Design
The Q8 features aggressive, modern styling. The massive Singleframe grille, sharp body lines and narrow LED headlights (laser units in top versions) create a distinctive appearance. The rear lights follow Audi's signature full-width light bar design.
Interior and Technology
The cabin combines minimalism with high-tech: Audi Virtual Cockpit digital dash, two touchscreens (upper for multimedia, lower for climate), and premium materials (leather, aluminum, wood). Options include 23-inch wheels, night vision, head-up display and Bang & Olufsen audio system.
Engines and Performance
European models offer gasoline, diesel and hybrid (Q8 TFSI e with 462 hp and up to 50 km electric range). Common Russian variants:
- 3.0 TFSI (340 hp, gasoline, 48V mild-hybrid)
- 3.0 TDI (286 hp, diesel)
- SQ8 - sport version with 4.0 V8 (507 hp)
The quattro all-wheel drive and adaptive air suspension make the Q8 capable both in city and off-road (ground clearance adjustable to 254 mm).
Interesting Facts
- The 2017 concept car is nearly identical to production model (rare in auto industry)
- SQ8 was initially diesel (4.0 TDI with 435 hp in 2019) before switching to gasoline V8
- Basis for RS Q8: This 600-hp monster holds Nürburgring SUV record (7:42.2)
- China gets extended Q8L version with longer wheelbase
Conclusion
The Audi Q8 isn't just a "Q7 coupe" but a standalone model with character. It blends sportiness, technology and comfort while remaining a practical SUV. The 2023 facelift enhanced its technological edge while retaining core strengths. For those wanting a stylish, powerful German crossover without the flamboyance of BMW X6 or Mercedes GLE Coupe, the Q8 is an excellent choice.