
 English
  Italiano
  Français
  русский
  Deutsch
  Español
 Depending on the year of manufacture, the mounting points may vary slightly.
Mazda RX-8: History, Modifications, and Interesting Facts
The Mazda RX-8 is a sports coupe with a unique design, produced from 2003 to 2012. The car succeeded the legendary RX-7 but featured a rotary piston engine (Wankel engine) instead of a traditional piston engine. The RX-8 stood out with its distinctive styling, rear "suicide doors," and strong performance.
Model Names and Codes
The official model name is Mazda RX-8 (chassis code SE3P). In Japan, the car was also sold as the Mazda Efini RX-8 in its early years (until 2002, the Efini brand was used for Mazda’s sports models).
Production Years and Facelift
- First Generation (2003–2008) – Debuted in 2003. The car featured an aggressive design with a long hood and a compact rear end.
- Facelift (2009–2012) – In 2008, the model was updated: the front bumper, grille, taillights, and interior were redesigned. Engine reliability was also improved.
Bumper Plastic Marking: >PP-(S21+T18)<
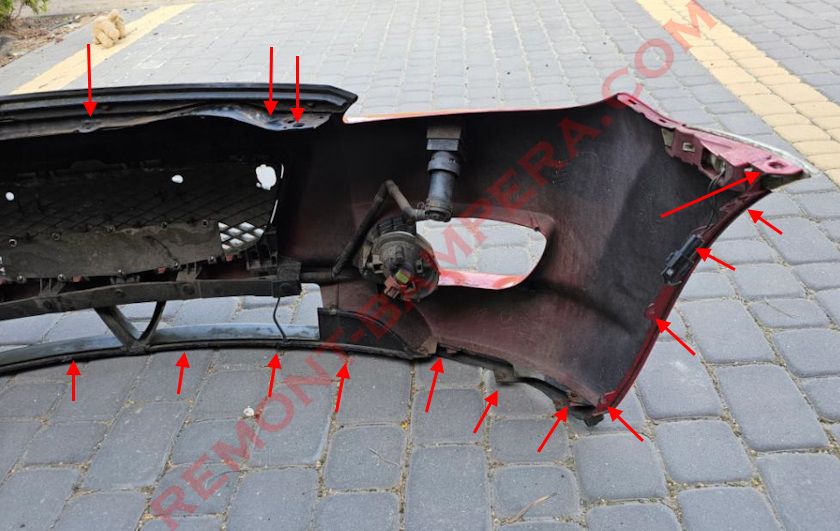
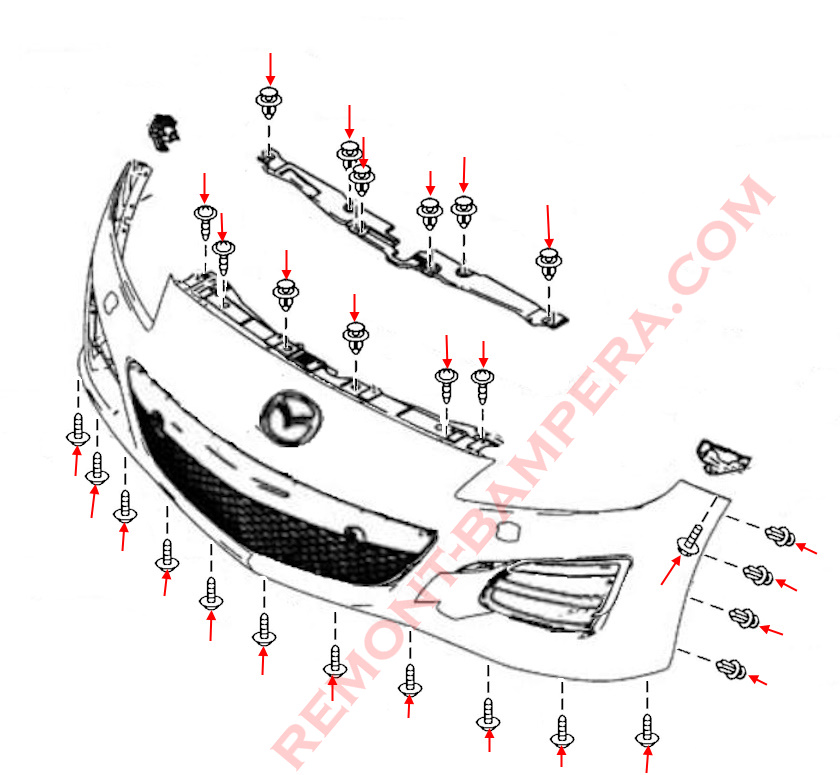
How to Remove the Front Bumper
- Lift the hood.
- Remove six clips under the hood and take off the cover.
- Under the cover, unscrew four screws (and remove two clips) securing the top side of the front bumper.
- Unscrew twelve screws (fastened from bottom to top) securing the bottom side.
- Turn the steering wheel to the side.
- In the wheel arches, remove six clips on each side securing the fender liners.
- Move the fender liners aside, disconnect the turn signal connectors (if equipped), and unscrew one bolt on each side (fastened from bottom to top) securing the corners to the fenders.
- Release the clips in the fenders.
- With an assistant, pull the bumper forward (mind the wires and hoses).
- Disconnect the fog light connectors (if equipped).
- If equipped with headlight washers, disconnect the hoses.
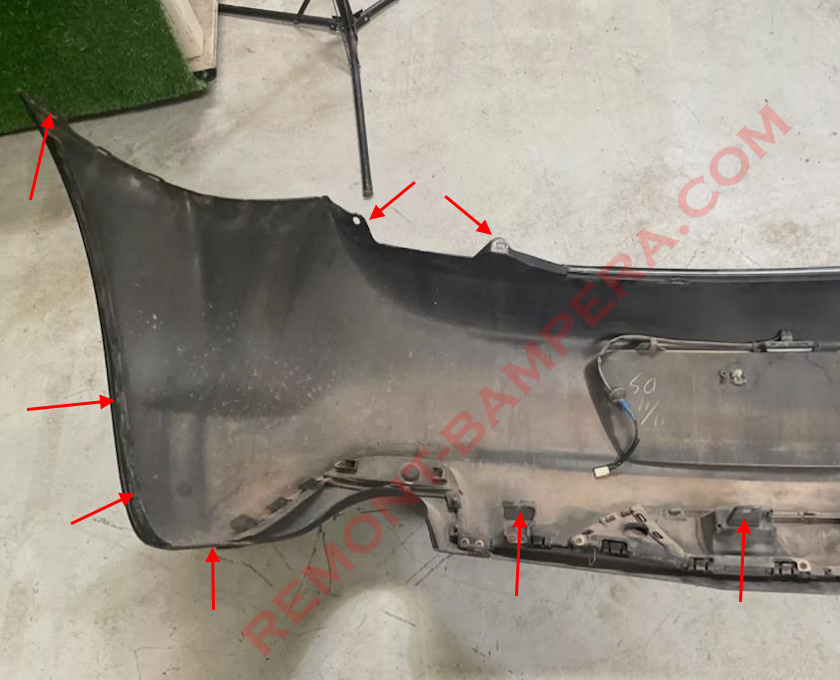
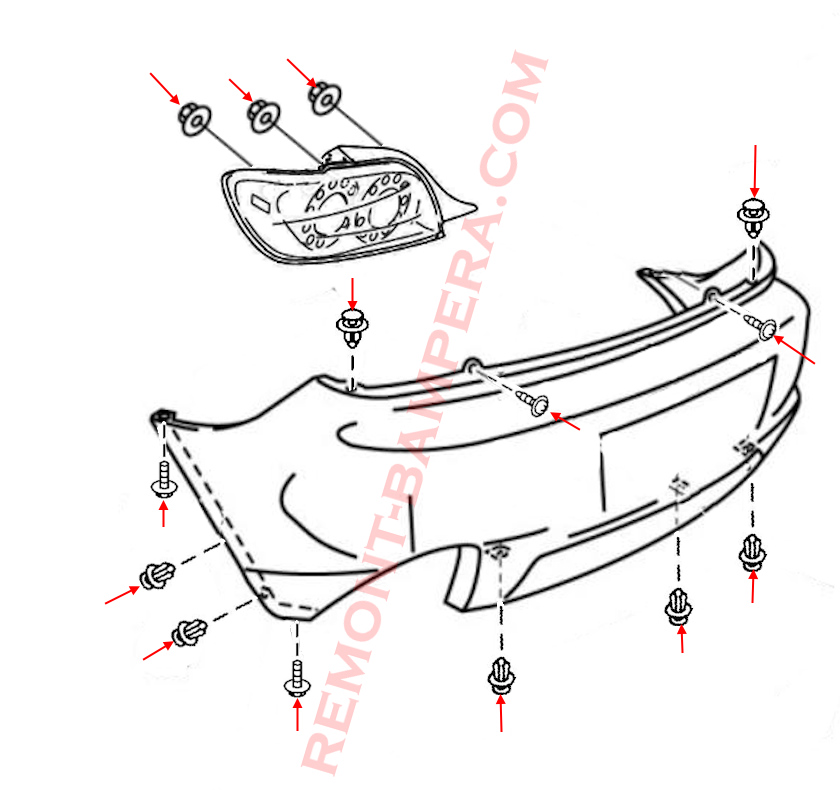
How to Remove the Rear Bumper
- Open the trunk lid.
- Remove the clips, release the fasteners, and take off the rear trunk panel trim.
- Unscrew three nuts on each side and remove the taillights.
- Under the taillights, unscrew two screws and remove two clips.
- From the bottom, unscrew two screws and remove three clips.
- In the wheel arches, remove two clips on each side securing the fender liners and unscrew one bolt on each side (fastened from bottom to top) securing the corners to the fenders.
- Release the clips in the fenders (grab the corner and pull sharply toward yourself).
- With an assistant, pull the bumper backward (mind the wires).
- Disconnect the license plate light connectors.
Body Type and Modifications
The RX-8 was offered in only one body type—a four-door coupe with rear doors that opened against the direction of travel ("freestyle doors"). Despite having four doors, the car was marketed as a 2+2 due to the cramped rear seats.
Main Modifications:
- Standard Version (192 HP) – Equipped with a 1.3-liter rotary engine (13B-MSP Renesis) producing 192 HP, paired with a 6-speed manual or 4-speed automatic transmission.
- High-Power Version (231 HP) – The same engine but tuned for 231 HP, available only with a 6-speed manual transmission.
- Sport Versions – Special editions were released in various countries, such as the RX-8 Type S (Japan), RX-8 PZ (UK, tuned by Prodrive), and RX-8 Shinka (USA, luxury trim).
Model Description
The Renesis engine was unique: with a displacement of just 1.3 liters, it produced up to 231 HP but required frequent maintenance and was sensitive to oil quality. The RX-8’s chassis had an almost perfect weight distribution (50:50), enhancing handling.
The interior had a driver-focused layout: low seating, a sporty steering wheel, and aluminum pedals. The facelifted version introduced a more modern multimedia system.
Interesting Facts
- Frameless Doors – The RX-8 lacked B-pillars, enhancing the sense of openness when the windows were down.
- Environmental Issues – Due to the rotary engine’s characteristics, the RX-8 failed to meet stricter emissions standards, contributing to its discontinuation.
- Racing Success – The RX-8 competed in the 24 Hours of Nürburgring and even won its class.
- Last Mass-Produced Rotary Car – After the RX-8, Mazda did not release another mass-produced Wankel-powered car until the MX-30 e-Skyactiv R-EV (2023), where the rotary engine serves as a range extender.
Conclusion
The Mazda RX-8 remains one of the most unusual sports cars of the 2000s. Despite its engine reliability issues, it is cherished for its original design, sharp handling, and uniqueness. Today, the RX-8 is a sought-after collector’s item and a favorite among rotary engine enthusiasts.