
 English
  Italiano
  Français
  русский
  Deutsch
  Español
 Production Years, Facelift and Model Code
The Mazda CX-7 is a midsize crossover produced from 2006 to 2012. This model occupied an intermediate position between the compact CX-5 and full-size CX-9, combining sporty design with practicality. The vehicle was developed for North American, European and Asian markets, but didn't achieve the same mass popularity as some competitors like the Toyota RAV4 or Honda CR-V.
Production Years and Facelift
The Mazda CX-7 was first unveiled at the 2006 Los Angeles Auto Show. Serial production began the same year at the Hiroshima plant (Japan). In 2009, the model received a minor facelift affecting the radiator grille, bumpers and interior. Production was discontinued in 2012 as Mazda focused on the more popular CX-5 model.
Model Code and Body Type
The CX-7 platform (model code ER) was based on an extended version of the Mazda MPV platform but incorporated elements from the Mazda 6. Body type: five-door crossover (SUV) with unibody construction. Dimensions: length ~4.68 m, width ~1.87 m, height ~1.65 m, wheelbase ~2.75 m.
Bumper Plastic Marking: >PP-(T25+S20)<
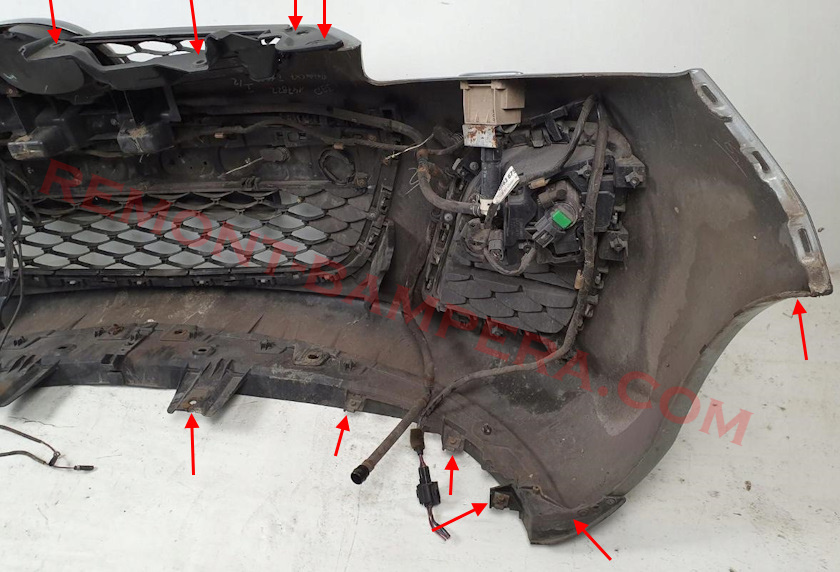
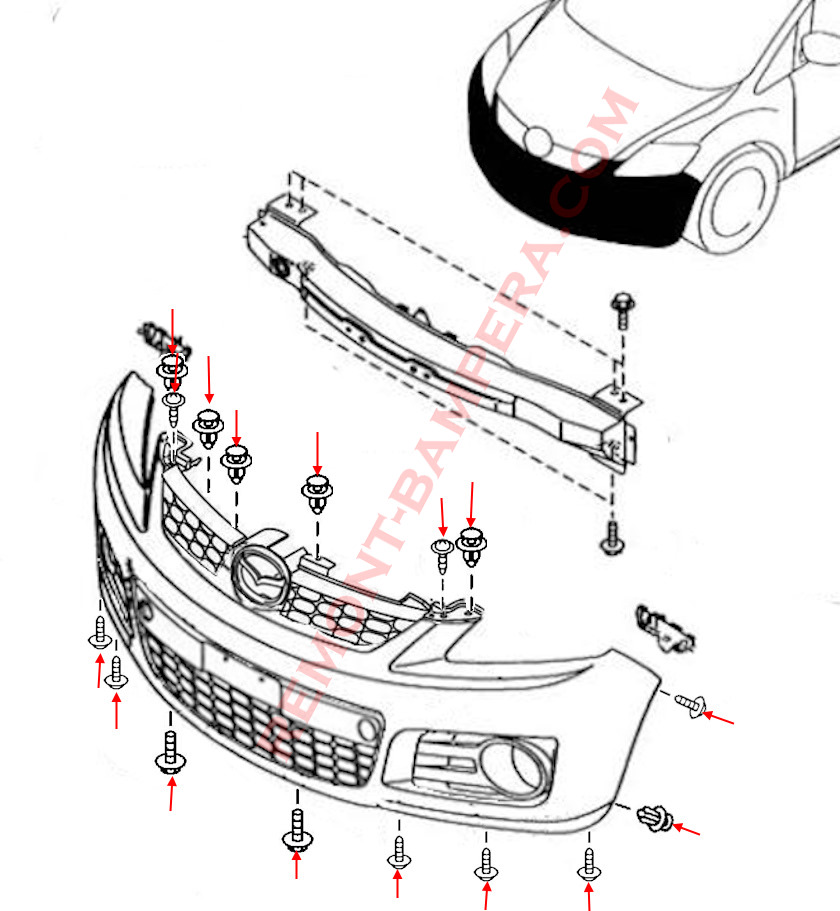
How to Remove Front Bumper
- Lift and secure the hood
- Under the hood, unscrew two bolts and remove five clips securing the upper part of the front bumper and radiator grille
- From underneath, unscrew eight bolts (inserted bottom-up) securing the lower part (various bolt sizes)
- Turn wheels outward
- In wheel arches, remove one clip and unscrew one bolt per side securing the fender liners (front part)
- Release sides from fender clips (pull bumper corners sharply toward you)
- With an assistant, remove bumper forward (mind wires and hoses)
- Disconnect electrical connectors (if present)
- Separate headlight washer hoses (fluid will drain from reservoir)
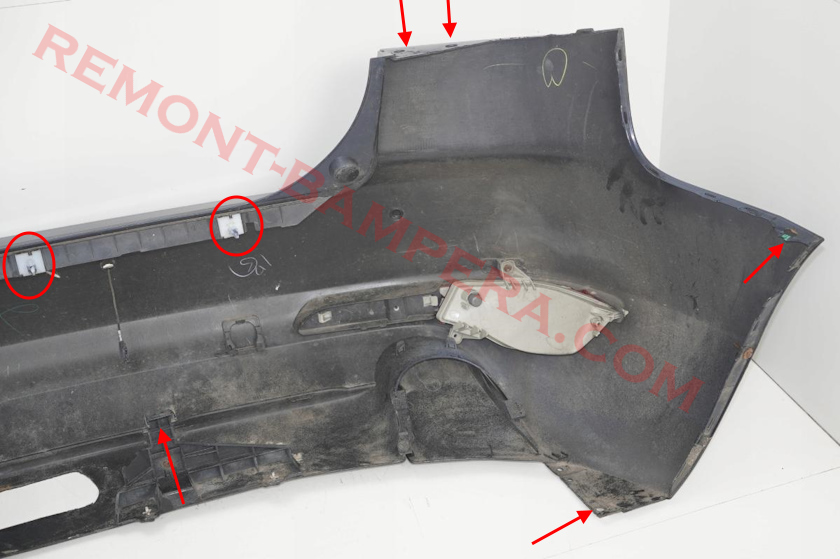
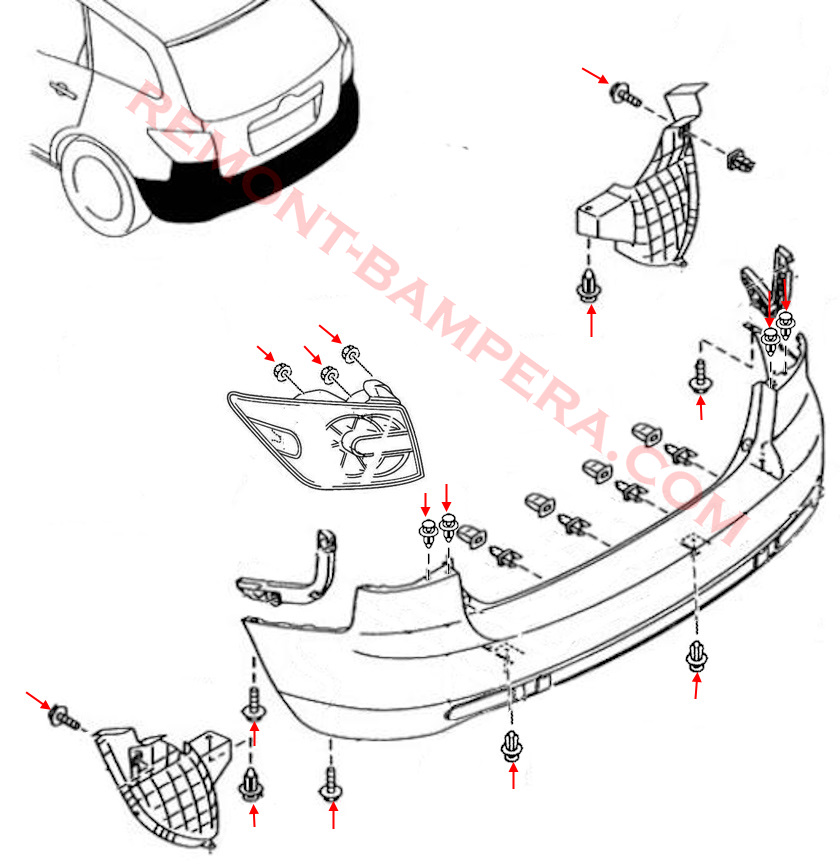
How to Remove Rear Bumper
- Open tailgate
- Open covers in side trunk linings
- Under covers, unscrew three nuts per side, disconnect electrical connectors and remove taillights (pull toward you)
- Below taillights, remove two clips per side securing the upper bumper part
- From underneath, remove two clips and unscrew two bolts (inserted bottom-up) securing the lower part
- In wheel arches, unscrew two bolts, remove two clips, release and remove fender liners
- Behind liners, unscrew one bolt per side (inserted bottom-up) securing corners to fenders
- Release fender clips (pull corners toward you)
- Release four fasteners in trunk opening (pull toward you)
- With assistant, carefully remove bumper backward (avoid damaging wires)
- Disconnect electrical components (if installed)
Engines and Modifications
Depending on market, the CX-7 was offered with different engines:
- 2.3L MZR DISI Turbo (L3-VDT) – turbocharged gasoline engine producing 244–260 HP (US/Europe), paired with 6-speed automatic and AWD (i-AWD)
- 2.5L MZR (L5-VE) – naturally aspirated 161–163 HP engine with FWD and 5-speed automatic (introduced post-facelift as cost-reduced version)
- 2.2L MZR-CD (SH) – 2.2L diesel (173 HP, 400 Nm) offered in Europe with 6-speed manual or automatic
After the 2009 facelift, some markets received a non-turbo 2.3L version which proved unpopular.
Model Description
The CX-7 stood out with its dynamic Nagare ("flow") design language Mazda used in the 2000s. The interior accommodated five passengers with split-folding rear seats (60/40). Cargo capacity: 446 to 774 liters.
Key features:
- Suspension: independent (front MacPherson, rear multilink)
- i-AWD system automatically engaged rear axle during slip
- Top trims: leather interior, climate control, xenon headlights, cruise control
Interesting Facts
- Sports ambitions: Developed as a "sports crossover" with handling focus
- Mazdaspeed6 relation: The 2.3L turbo engine came from the performance Mazdaspeed6 (Mazda6 MPS in Europe)
- No hybrid version: Unlike competitors, Mazda didn't develop a CX-7 hybrid
- Rarity in Russia: Officially imported only between 2007-2010
- Strategy shift: Poor sales led Mazda to focus on the more successful CX-5
Conclusion
The Mazda CX-7 represents a crossover that didn't achieve mass appeal but is remembered for its distinctive styling and sporty character. Today it's a relatively rare vehicle valued by enthusiasts. While its successor CX-5 proved more practical and successful, the CX-7 remains an interesting chapter in Mazda's history.