
 English
  Italiano
  Français
  русский
  Deutsch
  Español
 Production Years and Model Names
The first-generation Renault Duster (Mk1) was produced from 2010 to 2021 in various countries under different names:
- Renault Duster – the main name for Europe, Latin America, and Russia.
- Dacia Duster – the version for markets where Renault used the Dacia brand (e.g., Romania and some EU countries).
- Nissan Terrano – the facelifted version (2013–2021), sold in India, South Africa, and other countries under the Nissan brand.
The model was developed as an affordable crossover based on the Renault-Nissan B0 platform, which was also used in the Logan and Sandero.
Model Overview
Design and Construction
The Duster Mk1 featured a simple yet practical design with angular lines, high ground clearance (210 mm), and compact dimensions (length ~4.3 m). The body was monocoque, and the rear suspension was semi-independent (torsion beam), providing a balance between off-road capability and comfort.
Engines and Transmissions
Depending on the market, the following powertrains were available:
Gasoline engines:
- 1.6L (102–115 HP) – the base option for Europe and Russia.
- 2.0L (135–143 HP) – a more powerful version for Latin America.
Diesel engines:
- 1.5 dCi (85–110 HP) – an economical engine with low fuel consumption (around 5L/100 km).
LPG versions:
- In some countries (e.g., Russia), an LPG (liquefied petroleum gas) version was offered.
Transmissions:
- Front-wheel drive – for city driving.
- All-wheel drive (4×4) – with the EasyRide system (switchable automatically or manually).
Plastic Bumper Markings: >P/E<
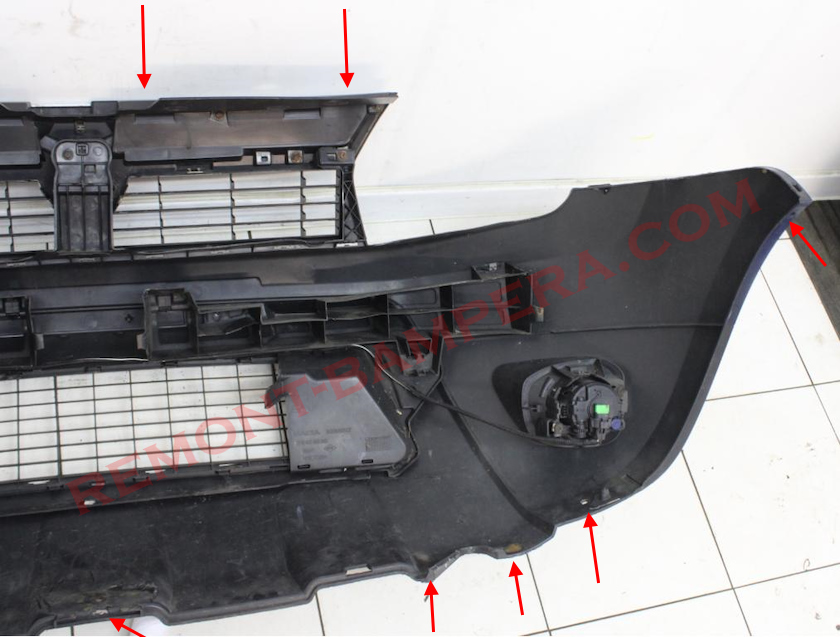
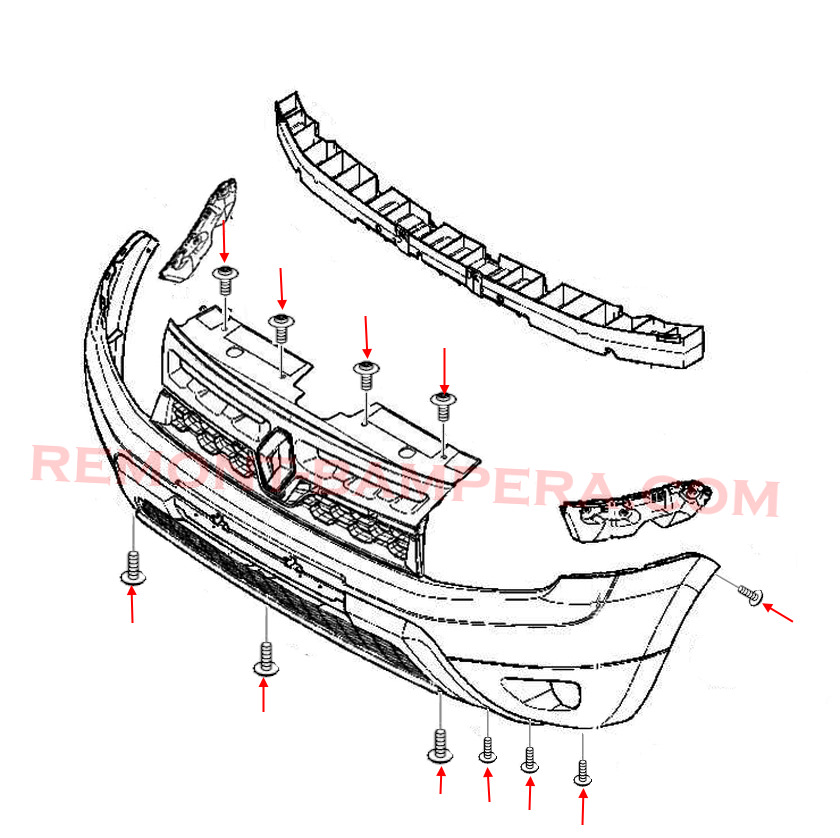
How to Remove the Front Bumper
- Lift the hood.
- From the top side of the front bumper, unscrew the four screws inserted from top to bottom.
- Unscrew the screws from the underside, which are inserted from bottom to top. Note: Torx screws of different sizes are used.
- In the wheel arches, unscrew one screw on each side, securing the bumper corners to the brackets in the fenders.
- Release the upper edge of the radiator grille from the clips by pulling it upward.
- Release the clips in the fenders by gently pulling the corners toward you.
- With an assistant, remove the bumper by pulling it forward. Caution: Do not tear the wiring.
- Disconnect the electrical connectors.
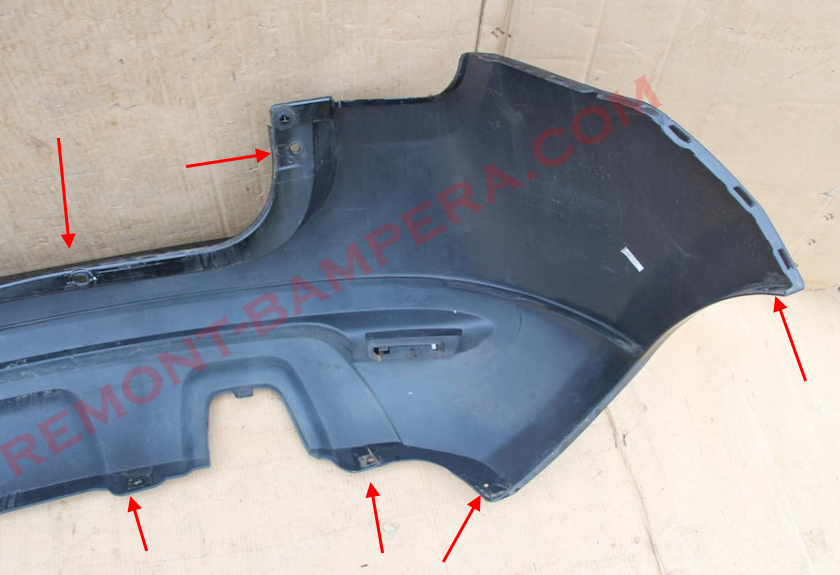
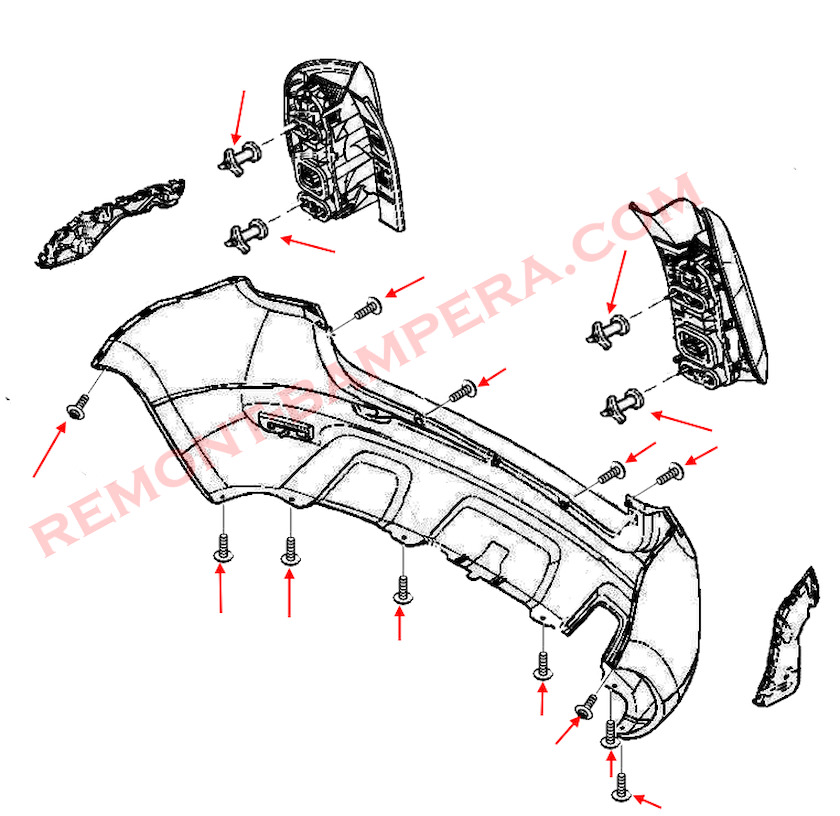
How to Remove the Rear Bumper
- Open the trunk lid.
- Open the covers in the side trunk linings.
- Under the covers, unscrew two special nuts on each side, disconnect the power connectors, and remove the rear lights.
- In the trunk opening, unscrew the four screws securing the upper side of the rear bumper.
- Unscrew the six screws on the underside, inserted from bottom to top.
- In the wheel arches, remove the splash guards and unscrew one screw on each side, securing the bumper corners to the fender brackets.
- Release the clips in the fenders and remove the bumper by pulling it backward.
- If parking sensors are installed, disconnect the main electrical connector.
Interior and Features
The Duster Mk1 had a simple interior with minimalist trim. The base version featured plastic panels, a non-adjustable steering column, and minimal electronics. However, higher trims included:
- Air conditioning.
- A multimedia system with Bluetooth.
- Cruise control (after the 2015 facelift).
2015 Facelift
In 2015, the Duster received updates:
- Redesigned grille, headlights, and bumpers.
- Added LED daytime running lights.
- Improved sound insulation.
- Updated interior (higher-quality materials, new dashboard design).
Interesting Facts
- Global Success – The Duster became one of Renault’s best-selling crossovers, with over 2 million units produced by 2020.
- Rally Participation – The Duster Dakar competed in rally raids, including the Dakar Rally (2012–2015).
- Global Production – Besides Romania (Dacia’s plant), the Duster was assembled in Russia (Moscow), Brazil, India, and other countries.
- Budget Reliability – Thanks to its simple design, the Duster earned a reputation as a rugged and low-maintenance vehicle, especially popular in rural areas.
- Generational Shift – The second-generation Duster was released in 2017, but the Mk1 continued production in India and Russia until 2021.
Conclusion
The Renault Duster Mk1 is a successful example of affordability, off-road capability, and reliability. Despite its simplicity, it gained popularity in many countries, especially where durability and ease of repair are valued. Even after newer versions appeared, the first-generation Duster remains in demand on the used car market.