
 English
  Italiano
  Français
  русский
  Deutsch
  Español
 Renault Captur: History, Modifications, and Interesting Facts
The first-generation Renault Captur is a compact crossover that debuted in 2013 and quickly gained popularity thanks to its stylish design, practicality, and affordable price. Positioned as an urban car with off-road-inspired elements, it essentially remained a front-wheel-drive model based on the Clio IV platform.
Production Years and Markets
The first Renault Captur was produced from 2013 to 2019 in Europe, but in some countries (such as Russia), manufacturing continued until 2020 due to delays in the release of the second generation.
Interesting fact: The Captur was initially designed for the European market but later expanded to Latin America, Asia, and Russia. In Brazil, for example, the model was assembled at the local Renault plant in São José dos Campos.
Platform and Technical Specifications
The Captur I was built on the B0 platform (Renault-Nissan B-platform), also used in the Clio IV and Nissan Juke, which explains its compact dimensions:
- Length: 4122 mm
- Width: 1778 mm
- Height: 1567 mm
- Wheelbase: 2588 mm
The car was offered only with front-wheel drive, though its exterior design (plastic wheel arch covers, increased ground clearance) gave the impression of a more rugged off-roader.
Engines and Transmissions
In Europe, the Captur I was equipped with petrol and diesel engines:
Petrol engines:
- 1.2 TCe (120 HP) – a turbocharged 4-cylinder engine paired with a 6-speed manual or CVT (EDC).
- 1.6 (114 HP) – a naturally aspirated engine available at launch, later replaced by a turbo version.
Diesel engines:
- 1.5 dCi (90 and 110 HP) – an economical option with fuel consumption of around 3.5–4 L/100 km.
In Russia, only petrol versions were offered:
- 1.6 (114 HP) with a 4-speed automatic or 5-speed manual transmission.
- 2.0 (143 HP) with a CVT.
Plastic Bumper Markings: >P/E<
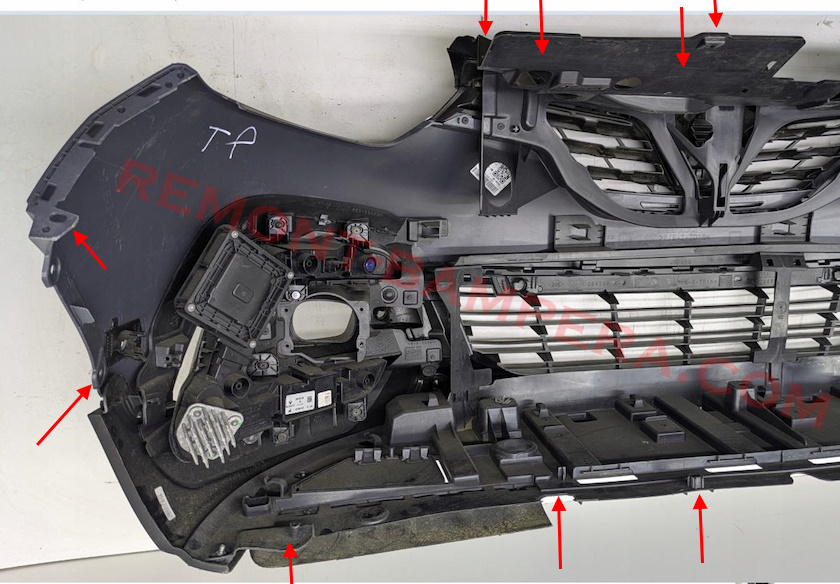
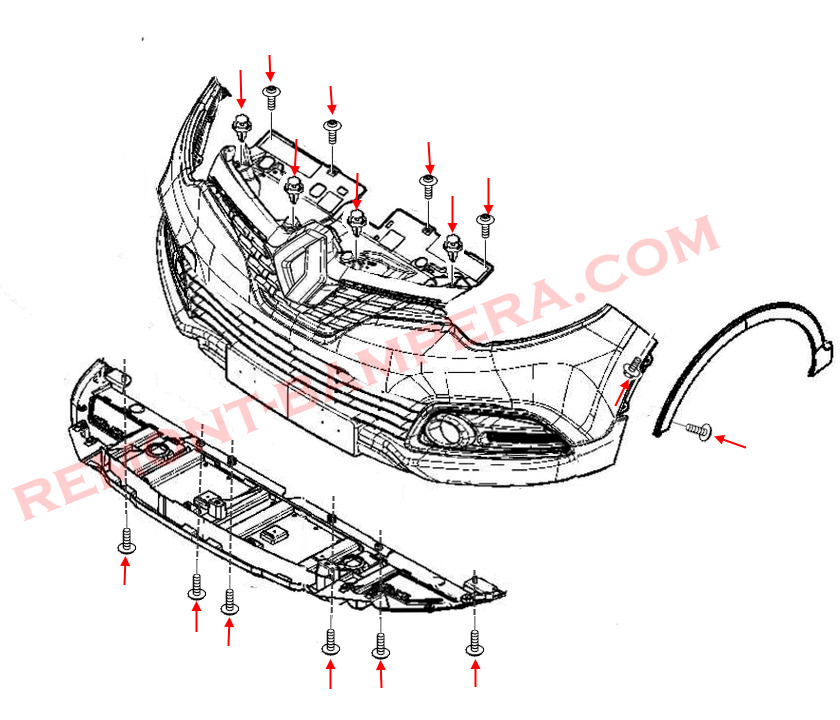
How to Remove the Front Bumper
- Start with the wheel arches—turn the wheels to the side.
- Unscrew the bolts in the wheel arches that secure the front part of the wheel arch liners and fender extensions.
- Release the fender extensions from the bumper; they are held by internal clips—pull them toward you.
- Unscrew one bolt on each side that secures the corners to the brackets in the fenders.
- From underneath, unscrew six bolts that are screwed in from below.
- Open the hood. Unscrew four bolts and remove four clips securing the top part of the radiator grille.
- Release the clips in the fenders by pulling the corners sharply toward you.
- (A second person is needed) Remove the bumper by pulling it forward—note the wiring.
- Disconnect the power connectors.
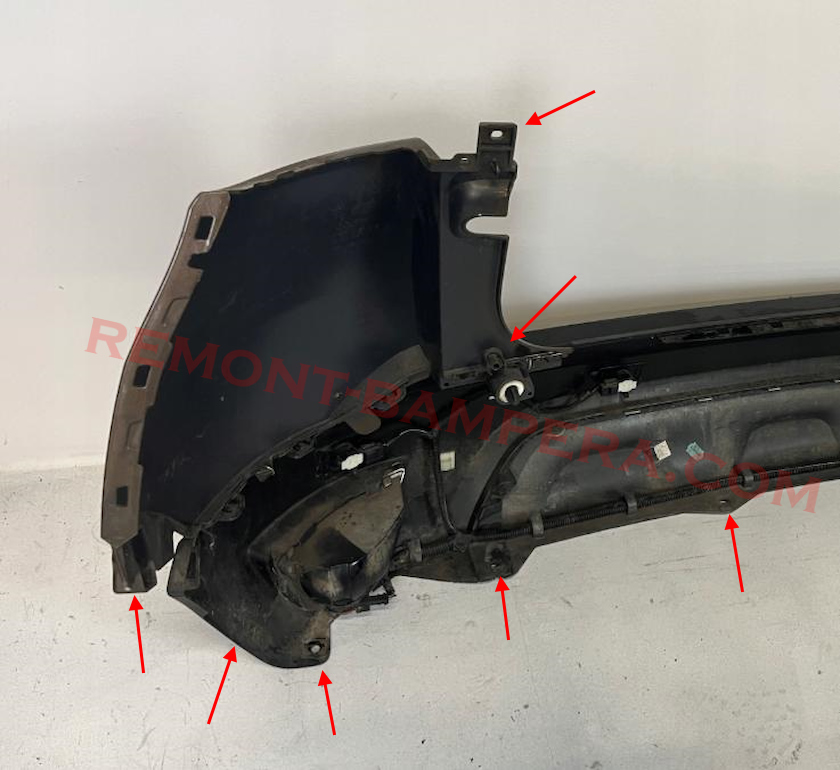
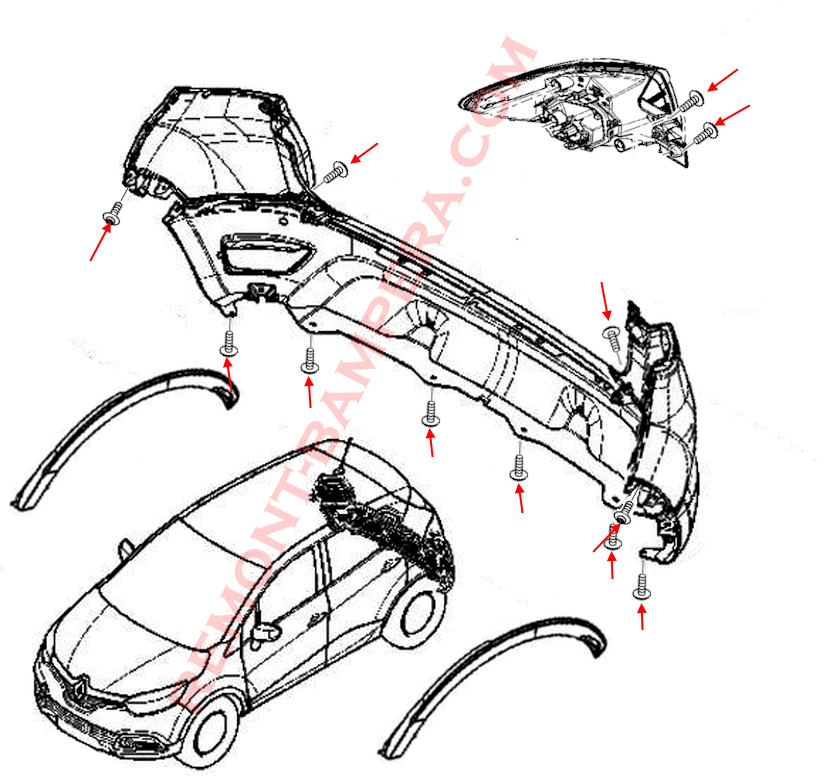
How to Remove the Rear Bumper
- Start by opening the trunk lid.
- Inside the trunk opening, unscrew two bolts on each side securing the taillights and two bolts securing the bumper.
- Disconnect the electrical connectors and remove the taillights.
- Move to the wheel arches. Unscrew the bolts and remove the splash guards. Also, unscrew the bolts securing the rear part of the wheel arch liners and fender extensions.
- Starting from the bottom, release the fender extensions from the bumper—they are held by internal clips.
- Unscrew one bolt on each side securing the corners to the brackets in the fenders.
- Unscrew six bolts from underneath, screwed in from below.
- Release the sides from the clips in the fenders.
- With an assistant, remove the bumper backward and disconnect the electrical connectors.
Trim Levels and Interior Features
The Renault Captur I featured a modular interior:
- Removable seat covers (color could be changed).
- Adjustable rear bench (could slide forward and backward by 16 cm).
- Trunk volume: 377 to 455 liters (with movable seats).
Top trim levels included:
- R-Link multimedia system with a touchscreen.
- Cruise control, rearview camera.
- Panoramic sunroof (optional).
2017 Facelift
In 2017, the model was updated with:
- A new radiator grille in the style of the Megane IV.
- LED headlights (for top trims).
- Redesigned dashboard and improved interior materials.
Interesting Facts About the Renault Captur I
- 2011 Concept Car: The Captur prototype debuted at the Geneva Motor Show with a much more aggressive design than the production model.
- Best-Selling Crossover in Europe: In 2015, the Captur became the sales leader in its class, surpassing the Peugeot 2008 and Opel Mokka.
- RS Line Sport Version: Some countries offered a styling package inspired by Renault Sport but without a more powerful engine.
- Hybrid Prototype: In 2014, Renault tested a hybrid version of the Captur, but it never entered mass production.
Conclusion
The first-generation Renault Captur is a typical compact crossover of the 2010s: stylish, economical, but without all-wheel drive. Despite its modest off-road capabilities, it won buyers over with its practicality and low price. In 2020, it was replaced by the second generation, built on the new CMF-B platform.