-
-
-
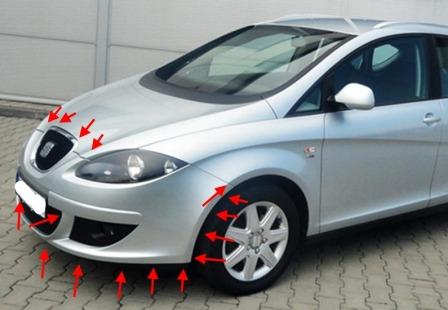
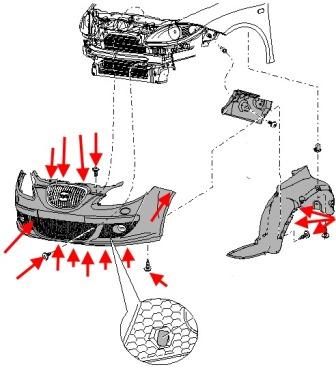
Front bumper
Depending on the model year and version of the attachment may vary slightly.
-open the hood and Unscrew the four screws (spun down).
-Unscrew one screw on each side at the edges of the lower grille (if any).
-Unscrew the eight screws around the perimeter in the bottom (spun up).
-Unscrew the wheel to the left or right side, depending on which side will parse the first.
-wheel arches Unscrew the screws that attach the fender liner.
-move the wing flaps to the side and Unscrew one screw on each side (twisted from top to bottom) that attach the angles to the wings.
-with the assistant pulling the edges to the sides and pulls the bumper from the guides themselves.
-remove connector from the PDC (if any).
-remove the connector from the fog lamp.
- if you have headlight washers, disconnect the hose and plug the cap to the reservoir was leaking fluid.
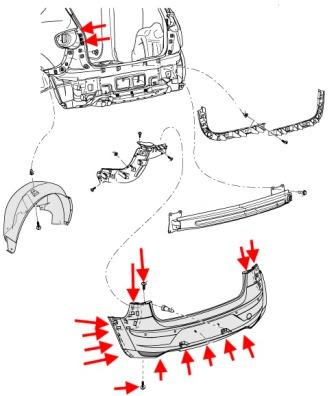
Rear bumper
Depending on the model year and version of the attachment may vary slightly.
-open the tailgate and Unscrew two screws on each side that secure the tail lights.
-remove tail lights.
-under the rear lights Unscrew two screws on each side (twisted upside down).
-Unscrew the screws in the wheel arches that secure the wheel arches (not to remove the wheel, remove ratchet with a nozzle).
-move the wing flaps to the side and Unscrew one screw on each side (spun up).
-Unscrew the screws around the perimeter in the bottom (spun up).
-with the aide of tear corners with latches and pulls the bumper from the guides themselves.
-remove the electrical connector license plate light.
-remove connector from the PDC (if any).


 English
  Italiano
  Français
  русский
  Deutsch
  Español