Front bumper

-Unscrew the wheel left or right depending on which side will Unscrew first.

-in the wheel wells, Unscrew the screws and take out the rivets that attach the fender liner to the bumper.

-move the wing flaps to the side and Unscrew one bolt on each side (spun upwards) holding the bumper to the wings.

-open the hood and on the edges of the headlight Unscrew one bolt on each side.

-throughout the length of the lower part of the bumper, Unscrew the bolts (spun up).

-with the assistant pulls the bumper itself.

-remove the connectors from the fog lights (if any).

-if there is paramilitary disconnect the hoses from the injectors and close them with stoppers that from the reservoir was leaking fluid

-if you have sensors, remove the common connector.

the attachment of the front bumper Mercedes W168

the scheme of fastening of the front bumper Mercedes W168


Rear bumper

⇒Tips for removing bumpers and how to avoid breaking anything..⇐

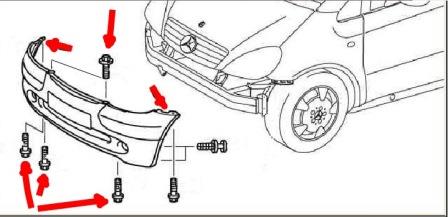
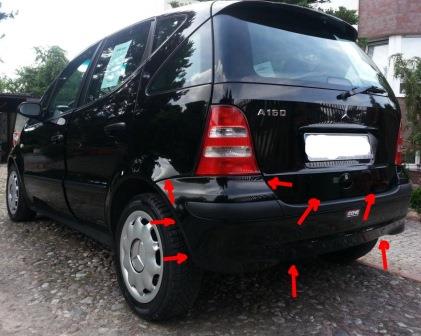
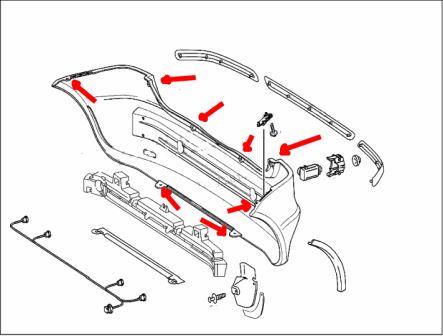
-in the wheel wells, Unscrew the screws and pull out the rivets that attach the fender liner to the bumper (so as not to remove the wheels, use a ratchet with a nozzle).

-the left and right sides move the wing flaps to the side and Unscrew the bolts that attach the bumper to the wing (spun up).

-the edges at the bottom of the bumper Unscrew one bolt on each side.

-open the trunk lid and the opening edges Unscrew one screw on each side (if there is, the two screws closer to the middle).

-pulls the bumper on yourself (do it better with an assistant, so as not to scratch the paint).

-remove connector from the PDC (if any).

-the bumper is cleared.

the attachment of the rear bumper Mercedes W168

diagram of rear bumper Mercedes W168


How to remove front and rear bumper Mercedes A-Class W169

How to remove front and rear bumper Mercedes A-Class W176