Production Years:

The Chrysler LHS II debuted in 1998 as a 1999 model and was produced through 2001 inclusive. Interestingly, it is technically a twin of the Chrysler Concorde, but the LHS was positioned one step higher.


Engine:

Gasoline naturally aspirated engine — 3.5-liter V6 EGG (3501 series). This was an all-aluminum construction with four valves per cylinder and two overhead camshafts (SOHC). In the LHS version, the engine produced 253 horsepower (at 6400 rpm) and 346 N·m of torque (at 3950 rpm).


The bumper mounting points are nearly identical to those of the second-generation Chrysler Concorde (1998–2004).

How to Remove the Front Bumper

  1. Raise the hood upward.
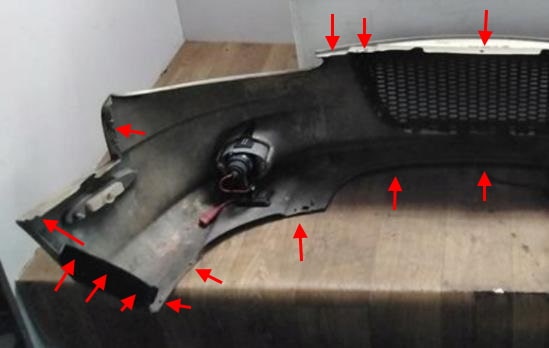
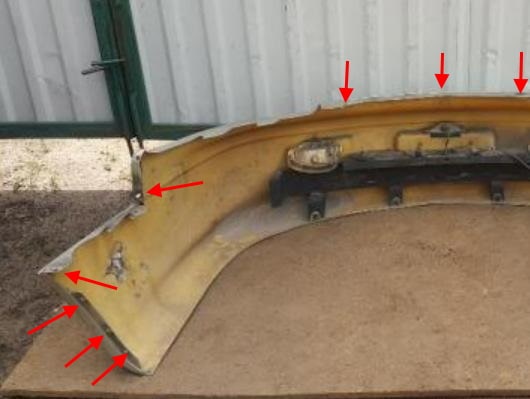
  2. Remove the clips that are inserted from top to bottom and secure the upper part of the front bumper.
  3. Get under the vehicle and remove the six clips that are inserted from bottom to top.
  4. In the wheel arches, remove two clips on the left side and two on the right side that secure the fender liners to the bumper.
  5. Behind the fender liners, unscrew one screw on the left and one on the right, which are threaded from bottom to top and secure the corners to the fenders.
  6. Now you will need a 10mm socket wrench and an extension about 40 cm long. In the fender liners, pull out the plugs and, through the openings that appear, unscrew the two nuts that secure the bumper to the fenders.
  7. With an assistant, pull the bumper forward and disconnect the electrical connectors.

Chrysler LHS front bumper mounting locations

Chrysler LHS front bumper mounting diagram


How to Remove the Rear Bumper

⇒Useful tips on how to remove the bumper and not break anything.⇐

  1. Open the trunk lid.
  2. In the trunk opening, remove the three clips that secure the upper part of the rear bumper.
  3. From inside the trunk, unscrew the nuts and remove the rear taillights.
  4. From the inner side of the fenders, unscrew the nuts.
  5. In the wheel arches, unscrew three screws on the left and three on the right that secure the rear part of the fender liners.
  6. Behind the fender liners, unscrew one screw on the left and one on the right that secure the bumper corners to the fenders.
  7. With an assistant, pull the bumper backward and disconnect the electrical connectors.


Chrysler LHS rear bumper mounting locations

Chrysler LHS rear bumper mounting diagram


Interesting Facts:

  • The LHS II featured a distinctive through-stripe between the headlights, uniting them with the grille. Designers called this the "suspended wing." But few know that this part was not just stylish — it functioned as an air intake for cooling the alternator, which was mounted horizontally and often overheated in traffic jams.
  • The car was equipped with a rear Nivomat pneumatic strut system. They automatically maintained ground clearance under any trunk load but required an oil change every 60,000 km.
  • In the top trim level, the windshield received a special coating that reflected thermal radiation. In summer, the cabin was 5–7°C cooler, but this glass cost four times more than ordinary glass and was only available through official dealers.


Advantages:

  • The LHS II had a wheelbase of 2870 mm, and rear legroom was greater than that of the BMW E39.
  • The seats were memorable for their adjustable headrests and heating for rear passengers.
  • The body was 75% galvanized, thanks to which these cars survived winters exceptionally well.
  • The 3.5 V6 engine pulled strongly, and highway fuel consumption was surprising — 9.2 liters per 100 km for a two-ton sedan.
  • The variable-assist power steering made parking easy even for elderly drivers.

Disadvantages:

  • The 4-speed 42LE transmission, past 150,000 km, would begin shifting from first to second with "jerks" — this was due to wear on the friction plates, and repair cost as much as half the car's value.
  • A systemic issue — the crankshaft position sensor. It is mounted at the rear of the engine, in a high-temperature zone, and would overheat, causing the car to stall while driving. Chrysler even issued a service bulletin recommending the installation of a heat shield.
  • The cabin climate control (dual-zone) often failed due to malfunctioning damper servomotors — they were made of brittle plastic that would crumble after 5 years.